How to add or remove Fee Particulars and Fee Discounts from Student Fee Collections

Managing-student-fee-collections

Planning fee collection schedules for hundreds of students is a time consuming process, but something that’s very important and cannot be avoided. To ease the process, many institutions at the beginning of the academic year, plan and decide the various types of fees each batch of students have to pay. All these fee types are then recorded in Fedena and the fee collection dates are scheduled for each batch. Each fee collection will consist of payment and discount heads or as Fedena calls it ‘fee particulars’ and ‘fee discounts’. When the fee collection dates draw near, often times institutions want to make changes to the scheduled fee collections. Institutions either want to remove certain fee particulars or fee discounts, or they want to add new fee particulars or fee discounts for a batch or for a particular student. Here’s how Fedena can handle this.


If you are using the Fedena version 3.4.1 or 3.4.2, the solution is simple. Use the Manage Fee Collections page to easily add or remove fee particulars and fee discounts from student fee collections.


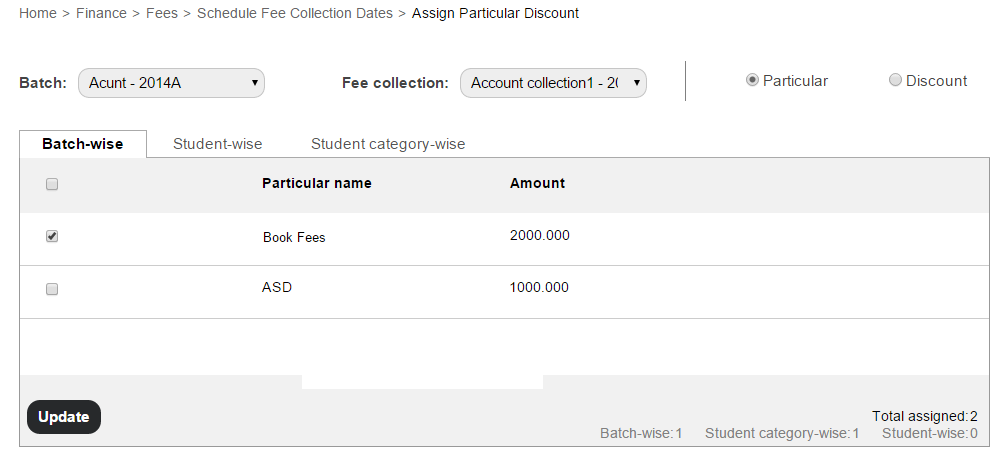
  1. Go to the Manage Fee Collections page (module access icon > Administration > Finance > Fees > Schedule Fee Collection Dates > Manage Fee Collections).
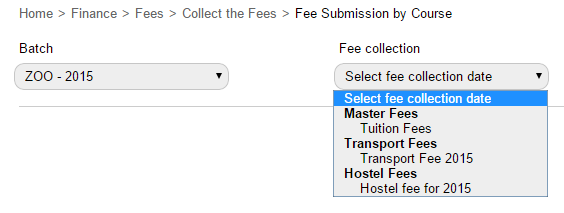
  2. Select the batch and the fee collection.
  3. If you select Particular, all fee particulars created for the batch, for a student, or for a student category are displayed.
    Managing student fee collections1 If you select Discount, all fee discounts created for the batch, for a student, for a student category, or for a fee particular are displayed.

    Managing student fee collections2
     
  4. Select the checkboxes to assign or remove fee particulars and fee discounts.
  5. Click the Update button.

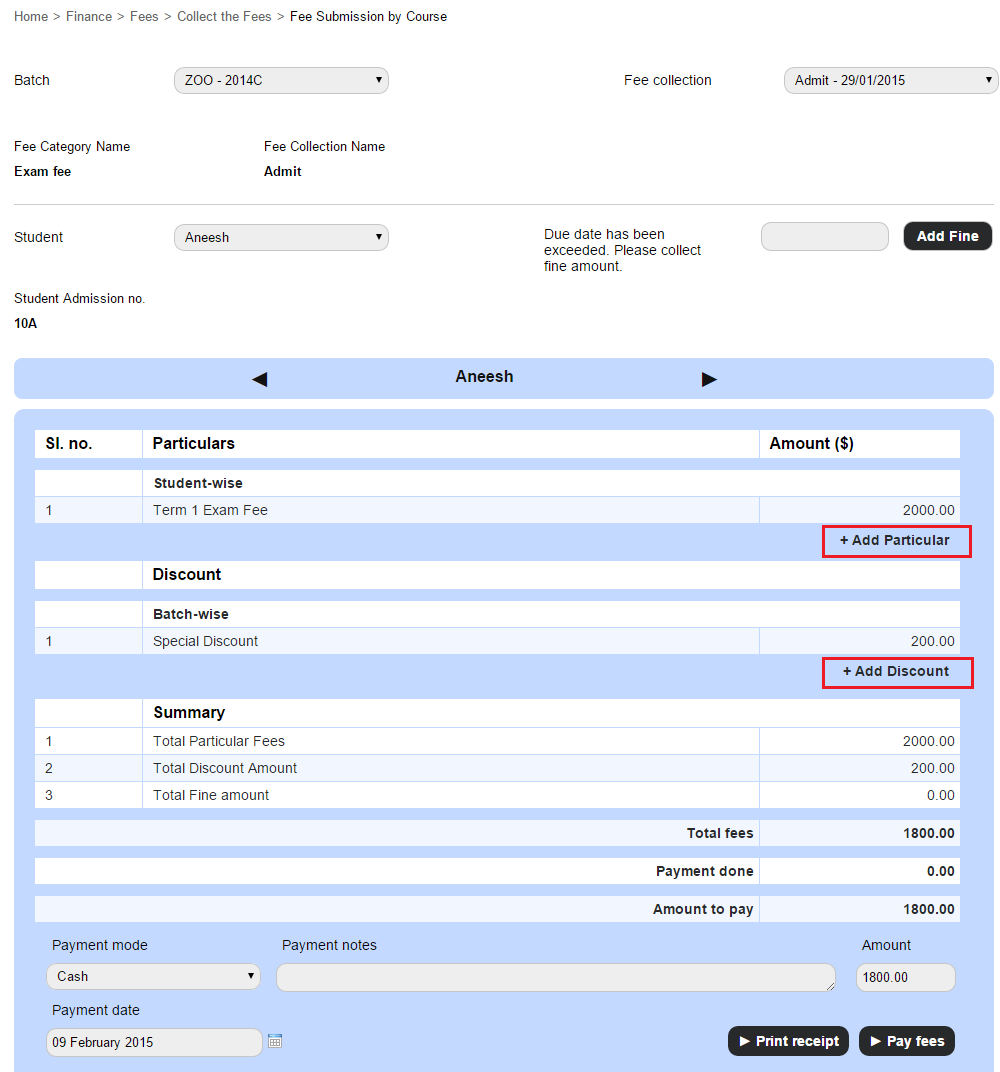
A point to note, if a student has paid the fees towards a fee collection, newly created fee particulars and fee discounts cannot be assigned to that fee collection, neither can existing fee particulars nor fee discounts be removed from that fee collection.

If you are using a Fedena version 3.4 and older, the only solution is to delete the scheduled fee collections, create the new fee particulars and fee discounts or delete the ones that don’t apply, and then schedule the fee collections all over again. This process can get even more tedious if you’ve already started collecting fees from students.

So if you haven’t already upgraded to the latest Fedena version – do it now!

26 Effective Ways to use Twitter for Teachers & Educators

Teachers & Educators in the present fast-paced, ever evolving world of communication are presented with a plethora of options which might sometimes be overwhelming. To reduce the efforts of teachers in learning a new form of communication, we give you some of the most effective ways of using the most modern form of communication, Twitter.

Twitter-Guide

Share this Image On Your Site

All you need to know about student admission numbers in Fedena

All-you-need-to-know-about-student-admission-numbers-in-Fedena2

Admission numbers are unique numbers allotted to students on their admission. No two students can have the same admission number in the institution, even if they are admitted to a different course or batch. Admission number may also be referred to as ‘Registration Number’, ‘Student ID’, or ‘Student Number’ in many institutions.

Where do I allot an admission number?

When admitting a student using the Student Admission form (Module access icon > Academics > Students > Student Admission), Admission number is the first field you will see at the top of the form. The Admission number field is a mandatory.

Auto Increment of Admission Numbers

Since every time a student is admitted an admission number must be allotted, institutions can choose to auto increment the admission number. This setting can be set by selecting the Enable auto increment of Student Admission No. checkbox on the General settings page. The first admission number will have to be manually entered according to the convention the institution intends to follow. From the next admission onwards, the number will be automatically incremented. For example:

  • If the first admission number is 1, the following admission numbers will be 2, 3, 4, and so on.
  • If the first admission number is A1, the following admission numbers will be A2, A3, A4,…A9, A10, A11, and so on. The alphabet ‘A’ will remain constant.
  • If the first admission number is 1A, the following admission numbers will be 1B, 1C,…1Y, 1Z, 2A, 2B…2Y, 2Z, 3A, 3B…3Y, 3Z, and so on.
  • If the first admission numbers is A, the following admission number will be B, C, D,…X, Y, Z, AA, AB,…AY, AZ, BA, BB…BY, BZ,…CA, CB,…CY, CZ, and so on.

If the Enable auto increment of Student Admission No. checkbox is not selected, you will have to manually enter the admission number every time a student is admitted.

Naming Convention

Institutions can follow a naming convention when creating admission numbers. Make note that admission numbers can only contain alphanumeric characters, underscores, and hyphens. Here are the conventions followed by some schools and colleges that use Fedena:

  • School 1 – Year of joining + a unique number. So the student admission numbers looked like this: 150001, 150002,…150067, 150068,…150666, 150667, and so on.
  • School 2 – School name abbreviated + a unique number. So the student admission numbers looked like this: DPA0001, DPA0002,…DPA0067, DPA0068,…DPA0666, DPA0667, and so on.
  • School 3 – School name abbreviated + a unique number. So the student admission numbers looked like this: DPA1, DPA2,…DPA67, DPA68, DPA666, DPA667, and so on.
  • College 1, for students of a particular course – Year of joining + Course name abbreviated + a unique number. So the student admission numbers looked like this: 03ZOO01, 03ZOO02,… 03ZOO44, 03ZOO45.
  • College 2, for students of a particular course – Year of joining + College code provided by the university it is affiliated to + a unique number. So the student admission numbers looked like this: 15045201, 15045202…15045244, 15045245.

Is there a quick way to allot student admission numbers?

The easiest and quickest way to create many student records in Fedena is to Custom Import the student admission records. When setting up the CSV file to be imported, enter the admission number for each student according to the naming convention your institution intends to follow.

Admission Number = Fedena Username

The student admission number is also the username that a student will use to log in to Fedena. It is important for students to remember their admission number. Many institutions may also ask the students to mention their admission number in any type of communication with the institution.

Can I change a student’s admission number?

Generally the admission number of a student remains unchanged till the student leaves the institution. However, if the admission number of a student needs to be changed, it can be done at any time from the student’s profile by the Administrator or a Privileged Employee. Students cannot change their admission number from their Fedena login.

Can I allot the admission number of a deleted student to a newly admitted student?

Yes, you can allot the admission number of a student who you have permanently deleted from Fedena to a newly admitted student.

Applicant Registration Plugin

The Applicant Registration plugin allows students to register to courses online. When a student is allotted to a batch of a course, the admission number is automatically allotted. The admission number follows the naming convention of the last admitted student, regardless of whether the last student was admitted to the same batch or to a batch of a different course.

Student Reports

Student admission numbers appear in all student reports including attendance reports, examination reports, course/batch reports, and fee receipts.

Searching Students

In Fedena, you can search for students from several areas based on your user role and privileges assigned. For example, you can search for students using the search bar at the top of your dashboard, when managing user accounts, when scheduling fee collections, when allotting transport, and many more. Apart from using the name of the student to search, you can also use the student’s admission number to search.

Let us know in the comment section if your institution uses a specific naming convention when allotting admission numbers.

Technology in Schools: What are the Opportunities and Challenges

Technology-in-Schools

See around and you find how technology has changed the way life is today. The same is with technology in schools- it has opened up a lot of opportunities for sure. The adoption of technology in schools has a different picture to offer in different countries. While some developed countries like the United States are looking for more technology to integrate in their schools, countries from the lesser developed parts of the world are still struggling with how to integrate technology in schools. While, there are lot of opportunities that technology has to offer to education institutions at all stages, there are some shortcomings that’s preventing widespread acceptance of technology in schools all over the world.

Opportunities are wide for technology in schools

When you talk about the opportunities for integrating technology in schools, we can actually see how technology is already transforming the way teachers teach in schools- a drift from text-based learning to something that would involve and engage students in the best possible way. Opportunities are plenty; here, we talk about four such opportunities that have every potential to take education to the next level.

  • A global learning platform is surely one blessing bestowed with the introduction of technology in schools. Students can opt to learn foreign language from natives of the particular country through videoconferencing. A lot of websites have come up with this kind of learning sessions via video conferencing call, letting students experience educational benefits minus the travel cost involved.
  • A paperless classroom is on the way. Cloud-based apps and tools like Google Drive, Gmail, Google Docs have a smarter way to offer to students and teachers to carry on their daily classroom learning. A definitely affordable option to save more time than the traditional methods of classroom teaching.
  • A great opportunity for technology in schools lies in the form of virtual reality (put the backlink to our blog)in classroom. Virtual reality has the power to transform classroom into a practical field for students to experience real life applications in a virtual world.
  • E-books have huge potential to change the face of education in the coming days. A lot of schools from different parts of the world have already discovered the huge potential of e-books, yet, some schools remains unaware.

There are challenges too!

The introduction of technology in schools is surely not an easy road to success. It has its share of bad patches which are to be met with.

  • Coming out of the comfort zone and accepting technology in schools is perhaps one of the biggest challenge to face with. Most of the times, teachers and school authorities are reluctant to experiment with new technologies in classroom, for they consider these experimentations are beyond their job descriptions.
  • Technology in schools has another setback- most schools are hesitant to implement distance courses, unlike the universities who have already joined the bandwagon of online courses.
  • The costing factor is always a prominent challenge for the adoption of technology in schools. Most schools do not have the funding to support the use of technology in schools. There is an initial cost involved in the purchasing and installation of technology. Moreover, the cost of maintenance, upkeep and upgradation involves an ongoing cost, which is, at times, financially unsustainable for most K-12 schools.

There are challenges to face; but the biggest test is to face these challenges, overcome and accept technology in schools and revolutionize education with improved opportunities for students.

Little Improvements to help you Personalize Fedena & Improve your Efficiency

Little-improvements-to-help-you-personalize-Fedena-and-improve-your-efficiency (1)

The Fedena team loves building new features that enable you to do things that weren’t possible before. But sometimes, it’s the small details that make a big difference. Along with all the big features that we have been releasing, there are also a number of little features and improvements we’ve made to Fedena. Here are some recently introduced features and improvements that will allow you to personalize Fedena and improve your efficiency as well.

Date Format

Fedena comes with a standard format for showing dates. However, you can change the date format to what you’d like in the General settings page. The date formats you can choose from are:

  • DMY – Date/Month/Year
  • MDY – Month/Date/Year
  • YMD – Year/Month/Date

In addition to the format, you can also choose a date separator you want to use, a forward slash (/) or a hyphen (-).
Something to note is that wherever dates are displayed in Fedena, they are displayed in predefined long formats (March 10, 1986) or short formats (10/03/1986).

K-12 vs. Higher Education

What type of institution are you? A K-12 institution who teaches preschool to class 12 or a college or university that offers various courses? You can choose your institution type in the General settings page.

  • If you select K-12 as the institution type, the term ‘Class’ is used throughout Fedena’s interface to indicate ‘a year of education’. ‘A year of education’ can be, Grade 7, Class 7, Standard 7, or Form 7, depending on your country’s educational system.
  • If you select Higher Education as the institution type, the term ‘Course’ is used throughout Fedena’s interface to indicate ‘the study of a particular topic’ such as, Bachelor of Zoology, Master of Business Administration, and so on.

Language Settings

Today, Fedena is used all over the world to manage an institution’s day to day activities. Fedena has been translated into the following languages:

  • Deutsch (German)
  • Dominican Español (Dominican Spanish)
  • Dutch
  • English
  • Español (Spanish)
  • Galego (Galician)
  • Italiano (Italian)
  • Russian
  • Türkçe (Turkish)
  • Français (French)
  • Português (Portuguese)
  • tiếng Việt (Vietnamese)
  • монгол хэл (Mongolian)
  • العربية (Arabic)
  • کوردی (Kurdish)
  • मराठी (Marathi)
  • हिंदी (Hindi)
  • ગુજરાતી (Gujarati)
  • 中國的 (Simplified Chinese)
  • 日本の (Japanese)

Instant Fee Particulars & Instant Fee Discounts

It can be a challenging task to schedule and track fee payments for all the students in your institution. Sometime, after meticulous planning and scheduling, you realize you have left out some students, or there are some last minute fees that a student has to pay. In such instances, you need not go through the complete process of creating fee categories, fee particulars, fee discounts, fines, and then setting up a new fee collection schedule. You can create instant fee particulars and instant fee discounts at the time of collecting and processing student fees.

Instant Fee Particulars & Instant Fee Discounts (1)

Course-wise Exam

If two or more batches of a course are being taught the same subjects, you can schedule an exam for all batches, or only selected batches at the same time.

  1. Go to the Create exam page (Module access icon > Academics > Examination > Exam Management).
  2. In the top right, click the Course-wise Exam button and then schedule an exam.Course-wise Exam (1)

Processing all student fees. One screen.

Why go to a different module every time you need to collect and process tuition, exam, hostel, transport, or any other fees for a student? It can all be done form one screen in the Finance module.
You can either do it when collecting fees batch-wise:

Processing all student fees (1)

Or when collecting fees from each student using the ‘Pay All Fees’ option:

Processing all student fees1 (1)

Activating and Deactivating Batches

When all students of a batch are transferred or graduated, the batch automatically becomes inactive. But did you know you can also manually activate and deactivate batches from the Manage Batch page (module access icon > Administration > Settings > Manage Course/Batch > Manage Batch)? Say you’ve created a batch and then decided you don’t want to use it immediately. So you don’t want to delete it, but at the same time you don’t want empty batches to appear in all the dropdown lists. In such instances, you can deactivate the batch temporarily and activate it only when you decide to use it.

Activating and Deactivating Batches (1)

Or, if you just want to view the list of inactive batches, you can do that as well.

Activating and Deactivating Batches1 (1)

4 Smarter Ways to Optimize Teaching through Technology in the Classroom

4-Smarter-Ways---FedenaTeaching through technology in the classroom will just not be the guidance that students require in today’s world, it’ll infuse in them, the required technological skills that’ll be their success key in the future. And teachers, being at the forefront of a student’s learning experience, plays an important and much responsible role of giving out the best learning experience to the students. With the help of various ways of teaching through technology, teachers can inspire students to learn more effectively. In this article we share with you, some effective ways to optimize teaching through technology in classroom.

Blended learning: Technology for teaching and learning has a new face- blended learning. It is a kind of learning opportunity that bring in together the traditional face-to-face and online learning. The main objective of blended learning is to prepare students with diverse learning styles, integrated in the day-today classroom learning activities. Teaching through technology like blended learning, allows students to learn better, at a faster rate and at their own convenience, at reduced cost of study materials- definitely, a smarter option for optimized learning.

Digital resources: With teaching through technology, have come the increased usage of digital resources in educational institutions that have given the right boost to learning and teaching in classroom. Digital portfolios, electronic grade books, learning games and real-time feedbacks on students and teachers are some of the smart technologies to power learning in the classroom.

A podcast for learning: Encouraging students and getting them into a podcast for the class, like reading out class lessons or discussions on particular topics can boost learning. Because, these podcasts are very good study references for the students in future.

Use social media platforms like Twitter and Pinterest: Pinterest is a great medium for teaching through technology, specifically because its a great visual medium that can encourage students to share their projects, classroom activities, photos, etc. Technology for teaching and learning can also include Twitter as a good learning platform. Students who are above 13 years can create important hashtags for classroom lessons and promote participation from experts in Twitter.

Technology if used in the right direction, can create wonders for teaching and learning. Teaching through technology at the right time, can inspire students to embrace technology without much hesitation, to optimize their learning. Teachers, on their part, can promote a healthy learning environment in the classroom with technology for teaching and learning.

Online Collaboration in E-learning: Tips and Tools

Online-Collaboration


All around the globe we are witnessing a transition towards collaborative learning. Our idea of collaborative learning arises from problem-based, case-based learning, team work, discussions, and other ways in which student is an active part in the learning process. Communities, also known as the wave of the future, are one of the top three most important components of e-Learning portals.  This post will tell you about the ten tips for using collaboration tools in e-Learning.

The benefits of collaborative learning are immense. It lets the learners gain from the experience of their peers and help them acquire and retain information in a more involved and engaged way. Therefore collaboration tools deserve special attention as an e-learning professional. But how do you use them?

The first requirement is to put focus on usability and accessibility when making the choice of collaboration tools for your eLearning course. In addition, you should also consider how the collaboration tool will serve your learning goals. In ideal conditions, your collaboration tool should be user friendly and can be accessed from a number of smart devices, which includes mobile phones and tablets.

  1. In order to motivate learners for using collaboration tools, the learners must always be made aware of the benefits associated with them. Without this awareness they won’t see any real value in using collaboration tools.
  2. If there are any current activities in your eLearning course that can go through some improvisation using the collaboration tools then do so.
  3. Whenever you perform any collaborative activity, it is necessary to understand that smooth working depends on the clarity of instructions and objectives.  As an instructor, you need to explain the purpose of the activity, and other necessary instructions should be delivered in a very clear and concise manner.
  4. Instructors should perform activities which are relevant and specific to the topic. Stuffing these activities with general information will make students lose interest and get bored. Infuse life in the activities through improving engagement, and relate with real life examples will invoke a much better response from the students.

Choosing the right tools for Online Collaboration Tools

For ensuring the best e-learning, it’s necessary to choose the best online collaboration tools. Here are some of the best tools that enable smooth collaboration amongst learners:

icon_color

MindMeister

This is a web based tool that makes it possible for groups to do planning or brainstorming during the early phases of collaboration. It offers mind map, various templates, SWOT analysis and project planning for collaborating during the course of a project as per the nature of their assignment. With live chat feature, it can offer direct and fast communication. You can also use MindMeister asynchronously.

Uzity LMS

Uzity

Uzity Learning Management System is the easy-to-use, and powerful online learning platform for education and online training. It offers interactive, engaging, and connected learning experience for all learners and instructors in your organization. By using Uzity, the instructor can deliver material to the students, administer tests and other assignments, track student progress, and manage record-keeping. It fits everywhere whether it is the classroom, in the workplace or at home.

proofhub

 ProofHub

ProofHub is an online collaboration software that helps organizations improve communication and collaboration among distantly located members in learning projects. Using the features of ProofHub, one can communicate through group chat, raise issues and these get resolved without wasting much time. This rapid communication ensures that all the members are at the same page in a learning project.

Sharing of files, documents and information becomes an effortless affair with ProofHub. Through Notes functionality, group members can collaborate and write some amazing content together. Sharing of ideas becomes very easy with ProofHub. The software takes care of the mobile world as it lets you connect with your projects on the go from their mobile. This way missing or delaying of tasks can be significantly reduced.

sliderocket_300px

SlideRocket

SlideRocket deserves special mention as it lets people create attractive and engaging presentations through its web based tools and features that can be accessed from anywhere. A single document can be accessed and modified by different members in a learning group. These random URL can be generated against each document which can be be submitted to an instructor for easy viewing. All multimedia features can be embedded in a presentation. You can pull data in real time from Google Spreadsheets, Twitter live feeds and Yahoo. It also offers you analytics feature which helps measure a presentation’s effectiveness. You can find through analytics about the audience who viewed it and their actions that followed.

googledocs

Google Docs

Google Docs is one of the most popular and common online collaboration tools available today.  Whether you want to create documents, powerpoint presentations or spreadsheets, Google Docs offer all these facilities. Due to its always connected feature, one can write, edit, and collaborate upon these documents from any remote location at any time and from various devices. Google docs automatically save the changes being made to the documents and it also keeps the previous versions of the doc in case you want to revert back. By referring revision history of a document, its old versions can be seen and can be sorted by date. Chat and commenting options are also there.

E learning is the order of the day and it’s going to grow in a bigger way in the future. The benefits are not limited to students. It’s advantages extend to a larger section of society, including the working population. Job oriented courses help you acquire new skills that make you more employable.  If you want to be a significant part of this revolution then effective online collaboration is the key to it.

The article is written by:

Saurabh Tyagi is a career author with niche in the upcoming technologies like Edtech, Big Data and Social Media. His article range from general career advice to expert opinion like the one above. These resources are useful for all sorts of professionals right from those searching for resume samples for freshers to experienced professionals at higher level.

How Timetable has Evolved to Become One of Fedena’s Most Used Modules

EvolutionOfTimetable


From inception to date, Fedena’s Timetable module has been helping schools and colleges of various sizes schedule and manage timetables. The Timetable module has evolved since Fedena’s inception in 2009. After three major Fedena releases, a number of minor releases, many enhancements, and bug fixes, the Timetable module has come a long way. Thanks to our customer feedback and employee input, we have been able to enhance the experience for our users with every release.

How good it used to be

When Fedena was introduced back in 2009, the Timetable module was one of our major selling points. Then, the Timetable module allowed institutions to create only one timetable. This timetable had to be followed by all batches in the institution. This meant, for all batches, every period had to begin and end at the same time. Though institutions liked how easy it was to create a timetable, it soon became a challenge when each batch had different period timings and needed their own timetable.

For those of you who have been with us from the start, here’s a hazy image that might bring back some good memories, and some not so good ones as well.

1

A point I must add, from the very beginning, Fedena’s user experience has always been one of our top priorities. Even back then, the Timetable module was easy to use and included the smooth drag and drop functionality what you see today.

How better it became

With releases that followed, the Timetable module quickly evolved. Soon features such as the ability to create a timetable for each batch, define the workdays in a week for each batch, together with a few cosmetic enhancements were introduced. By now the Timetable module was gaining popularity among users. This is what the Timetable module looked like back then.

2

Then, with the release of Fedena 3.0, we introduced the concept of ‘class timings’. Class timings allowed institutions to define the number of periods and the duration of each period in a workday. The class timings were then automatically applied to all workdays of the week. Though this gave institutions a little more flexibility when creating timetables, it later brought about the question of ‘What if for a batch, periods begin and end at different times on each workday?’

The best yet…

As an answer to that question, we introduced ‘class timing sets’. Similar to the concept of ‘class timings’, a ‘class timing set’ defined the number of periods and the duration of each period in a workday. The difference was, institutions were now able to assign a unique class timing set to each workday. This brought about a small change in the workflow of creating a timetable. Here’s the current workflow to create a timetable.

3


In addition to all the enhancements, we also managed to give the Timetable interface a facelift, as seen in the image below.

4

All these features put together now offer institutions even greater control over the timetables they create. Today, Timetable is one of the most used modules by Fedena customers. And to let you in on how we plan to improve the Timetable module, we’re now working on ways to automate timetable generation to enable you create timetables even faster. So stay tuned for upcoming releases.

10 Smart Technology Tools for Teachers

10SmartTechnologies


Technology and education are connected to each other, in a way that makes education and learning more engaging and fun. Smart technology for teachers are available to shape the way children learn, in a better way. Today, we talk about 10 such technologies that teachers can utilize in classroom to optimize the learning process.

Khan_Academy_Logo.svg

  1. Khan Academy: Technology resources for teachers definitely includes Khan Academy which offers excellent collection on various subjects like maths, science subjects; lectures on finance subjects as well as quizzes to carry out normal classroom activities.why-quora-s-new-boards-feature-makes-it-a-better-network-1c26db7f09
  2. Quora: Quora has been in use widely for quite a number of purposes and it can be one of the best technology tools for teachers and educators. A nice medium to get the students engaged in a discussion on education topics or get their doubts cleared by posting questions in quora.
    Capzles-Online-Timeline-Maker-Logo
  3. Capzles: Capzles allow you to gather videos, photos, blog posts and documents in one place. Teachers can use it for conducting online projects and for classroom learning as well. Explore and use Capzles for different ways in the classroom.googledocs
  4. Google Docs: Google docs is an effective technology for teachers in the classroom. Educators can create feedback forms for projects done by students. Moreover, creating and sharing documents, spreadsheets, presentations between the teacher and students in the classroom is swift with Google Docs.

    Evernote-logo

  5. Evernote: Evernote allow its users to be well-organized; capture and store photos, ideas, recordings or anything else and get access to it anytime, anywhere. Perfect for lesson-planning.

    socrative-logo-hires

  6. Socrative: Encourage students in various exercises and games through this student response system called Socrative. Available in tablets, computers as well as mobile, this tool let teachers get access through students progress and grades also.
    YouTube_logo_2013.svg
  7. YouTube: YouTube contains lot of important study materials that can be utilized in the classroom to optimize learning. YouTube also has a special section for education as well. Some restrictions and students can make the most out of YouTube without getting distracted.

    Dropbox-Logo

  8. Dropbox: One of the best technology resources for teachers to store, get access and share any kind of data from anywhere, Dropbox is free and easy-to-use.

    Twitter_logo_blue

  9. Twitter: Twitter has a lot to offer to educators- letting teachers get connected with their counterparts from different parts of the world  and talk about teaching methods, share their ideas and use it in classroom to connect with students.

    slideshare_550x150

  10. SlideShare: Uploading presentations, video projects and any other documents is pretty easy with SlideShare. Share with students and also, ask students to upload their classroom projects and presentations.

Introducing Fedena 3.4.2

Fedena 3.4.2 - Article (1)

Today, we are excited to announce our newest release, Fedena 3.4.2 featuring a simpler way to schedule exams, a faster and convenient way to process various student fees, SMS notifications when importing data into Fedena, and many more. In addition to the new and enhanced functionality, we’ve also focused on some key bug fixes directed towards an even better usability for all users.

To highlight some of the new and enhanced features:

  • Save time by scheduling exams for all batches of a course at the same time.
  • Customize the type of donor information you want to capture by adding custom additional fields.
  • In addition to the payment gateways that Fedena already supports (PayPal, Interswitch, and Authorize.net.), Fedena will now also support:
    • Stripe
    • Braintree
    • PayU
    • CCavenue

And to offer you even greater control and flexibility for online payments, you can now integrate any custom payment gateway with Fedena.

  • Enhanced the Continuous and Comprehensive Evaluation (CCE) grading system to keep in line with the Central Board of Secondary Education (CBSE) guidelines.
  • SMS notifications are not just for activities performed in the Fedena interface. Now, send and receive SMS notifications for activity performed through Custom Import and using Fedena API as well.
  • Collect and process all types of student fees, such as finance fee, transport fee, and hostel fee from a single view.
  • Generate the employee attendance report for any date range that you specify.

We hope you are excited as much as we are with the new features and enhancements.

And to make this release even sweeter for us, today Foradian celebrates its 6th anniversary. That’s right! Foradian turns six years old. So whether you’ve worked with Foradian over the past six years or have just been introduced to us, thanks for being a part of our journey.

Write to us at info@fedena.com and let us know your thoughts, questions, and feedback about the release. We would also like you to share how your experience has been with Foradian over the past six years on our Facebook or Twitter pages with the hashtag #ForadianTurnsSix.

Interactive Dashlets – Instant access to the information that matters most

InteractiveDashlets
With an information management system as detailed as Fedena, you are going to have all kinds of data coming from different parts of your institution. This can sometimes make tracking and reviewing of information difficult, especially when certain types of information needs to be monitored frequently. So make things easier for you, we introduced Dashlets.


So what exactly is a dashlet? A dashlet gives you a quick overview of the information that matters most to you—like your institution’s income and expenses, the timetable for the day, the exam scheduled for the day, and more. The Fedena dashboard features a collection of dashlets that display only the important information generated from its complementary page.


Now, we never stopped there. With the release of Fedena 3.4, we made dashlets even cooler by adding clickable links that take you right to that specific Fedena page, allowing you to act immediately.
Interactive Dashlets

List of dashlets and information users can access

The table below explains what each type of Fedena user can see and do with their dashlets.

NA – Dashlet not available for that user role.

Dashlet

Administrator / Privileged Employee Student

Parent

Absent Students View the names of absent students. Click a student name to view the student’s profile. NA

NA

Admitted Employees

View the names of admitted employees. Click an employee name to view the employee’s profile. NA NA
Admitted Students View the names of admitted students. Click a student name to view the student’s profile. NA

NA

Birthdays

View the names of students and employees celebrating their birthday. Click on a name to view their profile. Can only view the names of students and employees celebrating their birthday. NA
Blogs View the title and author of the blog posts. Click the title to read the blog post and comment. View the title and author of the blog posts. Click the title to read the blog post and comment.

NA

Book Return Due

View the names and details of books you must return. Click the name of the book to go to the View Books page and reserve the book. View the names and details of books you must return. Click the name of the book to go to your profile and view all the books borrowed with their due dates. NA
Discussions View the title of the discussion and name of the user who initiated the discussion. Click the title to join the discussion and comment. View the title of the discussion and name of the user who initiated the discussion. Click the title to join the discussion and comment.

NA

Employees on Leave

View the names of employees who are on leave. Click an employee name to view the employee’s profile. NA NA
Events Can only view the event details. Can only view the event details. Can only view the event details.
Examinations View the exam details. Click on the exam name to go to the View Exam Groups page. Can only view the exam details.

Only view the exam details.

Fees Due

Can only view the scheduled fee collection details. View the scheduled fee collection details. Click on the fee name to pay the fees.

View the scheduled fee collection details. Click on the fee name to pay the fees.

Finance

View the institution’s income and expenses for the day. Click on the link to view all transactions for the day. NA NA
Leave Applications View the names of employees who have applied for leave. Click an employee name to approve or deny the leave. NA

NA

News

View the news title. Click the title to view and comment on the news. View the news title. Click the title to view and comment on the news.

View the news title. Click the title to view and comment on the news.

Photos Added

View the title and a thumbnail of the photo shared. Click the title to view the photo(s). View the title and a thumbnail of the photo shared. Click the title to view the photo(s).

NA

Placements

View the placement details. Click the title of the placement to view the complete placement details. View the placement details. Click the title of the placement to view the complete placement details. View the placement details. Click the title of the placement to view the complete placement details.
Polls View the poll title and the number of votes. Click the title to give your vote.

View the poll title and the number of votes. Click the title to give your vote.

View the poll title and the number of votes. Click the title to give your vote.
Relieved Students View the names of archived students. Click a student name to view the archived student profile. NA

NA

Removed Employees

View the names of archived employees. Click an employee name to view the archived employee profile. NA NA

SMS Sent

View the recipients’ contact numbers and the message that was sent. Click on a contact number to view the SMS log. NA

NA

Tasks Due View the title of the task. Click the title to view the complete task details and reply. View the title of the task. Click the title to view the complete task details and reply.

NA

Timetable View the timetable for the day. Click a subject to view the complete timetable for a batch. View the timetable for the day. View the timetable for the day.

A dashlet is only worth the value of the information it displays. Take a look at your dashlets and let us know if the information they display is helpful to you, or if it can be improved.

6 Important Features of a School ERP to Look out for

6important-ERP
According to a statistical report published by NASACT’s 2012 “Challenge of Change” and GFOA’s “Real Impact of ERP Systems in Public Sector”, on the shortcomings of ERP implementation, 60% of organizations under the survey reported disappointment with their ERP system*
This is a common problem when it comes to adoption of ERP system, more specifically when it’s about ERP in school. Education institutions always have the pressure of maximizing performance with the least resources available. An ERP is what can help institution cope up with the demanding situation. ERP in schools is the road to an easy management of a whole lot of organizational issues, leading to a lot of saving of time and money.Accelerating an institution’s operations is a smart move to save time and invest it in what’s more important- educating the students.In our last article, we had talked about the advantages and limitations of an education ERP. Today, we will see what are the characteristics that should be considered while choosing an ERP for an institution.

Features of a good School ERP

Choosing an ERP for education institution is not easy and should not be done in a haste. Proper research work on the characteristics is important before taking the next step. We bring to you 6 important points to look out for in a school ERP.

  • A good ERP should be complete: Now, what do you mean by a ‘complete’ ERP system? First of all, you should be sure of all the requirements you have from an ERP system for your institution. An all-inclusive ERP system for an education system should be able to take charge of almost all of the functions of an institution. If an ERP is not able to fulfill the required promises and most of the functions has to be done manually, it’s surely a big ‘no-no’ for this kind of ERP in school.
  • Scalability: Most educational institutions cannot afford constant upgradation of the software. ERP in schools must be scalable and can be scaled up or down according to the demands of the institution.
  • A stable support system: While choosing a school erp, it’s highly important that the ERP provider company assures a good support system, mainly after the system is successfully installed in the institution. Constant upgradation and the timely updates are what makes part of a good support system.
  • Easy to adapt: The report by GFOA and NASACT, 2012 on the pain points of ERP implementation says that 62% of end-users had problem with adoption of the software and usage. An ideal ERP should be easily adaptable to the end-users. School authorities or administrators might not be highly fluent in the technical front and hence, complicated systems will come with the unfamiliarity and uncomfortability quotient with them.
  • Cost-effective and ROI benefits: The cost of erp in schools is not just about the purchasing and implementation cost, but it also includes the expenses in future for maintenance, upgradation, etc. An ERP system should offer a very clear picture of the expenses involved, minus any hidden cost which affects the targeted ROI of the institution.
  • A widely accepted school ERP: A widely accepted ERP would ensure adequate resources for implementation and support. Certified customers and partners stand as a guarantee for its authenticity and thus, offers maximum effective use. The more the number of customers, the greater the chances of effectiveness of the ERP.

There are quite a number of names in the industry to lure you with great offers and perks. But when it comes to your education institution, you shouldn’t take chances and a proper research work is always recommended. Always go for an ERP in school that consummate your institution’s needs and essentials.

*NASACT’s “Challenge of Change” and GFOA’s “Real Impact of ERP Systems in Public Sector” 2012 (in association with Microsoft Dynamics)