Fedena Multi School ERP system – Analytics, Multiple Admins and SMS Settings

The most important part of any School ERP system are the analytics and the ease of access by multiple users of the system. Last week we discussed how you could setup your payment gateways, white-label Fedena to your institution’s name and assign multiple plugins to various institutions in your group. Most institutions function by setting up a communication with their teachers and parents via SMS notifications of various activities, ranging from attendance to event dates, payment reminders to refund of fees paid, to set this up let’s learn how to setup SMS packages in Fedena for your group of Institutions.


Fedena multi school erp system


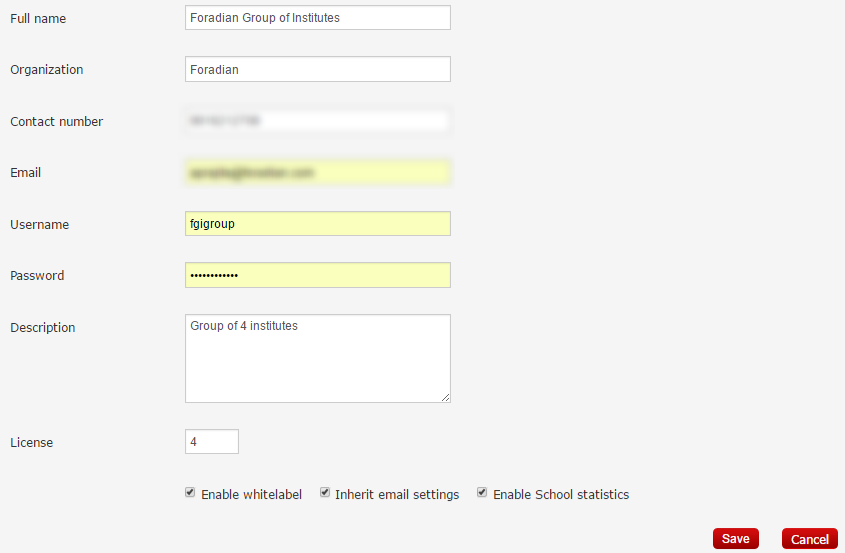
Create and assign SMS packages to group of Institutions


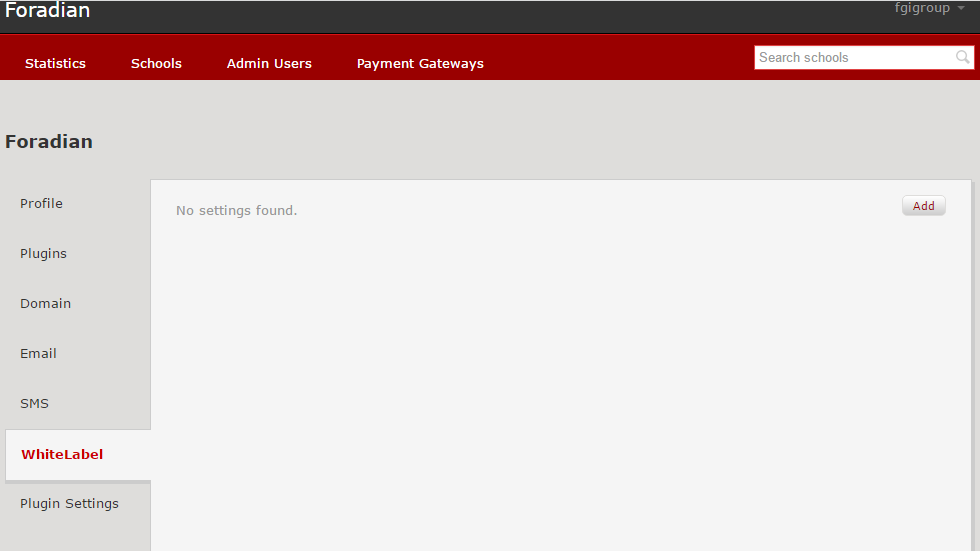
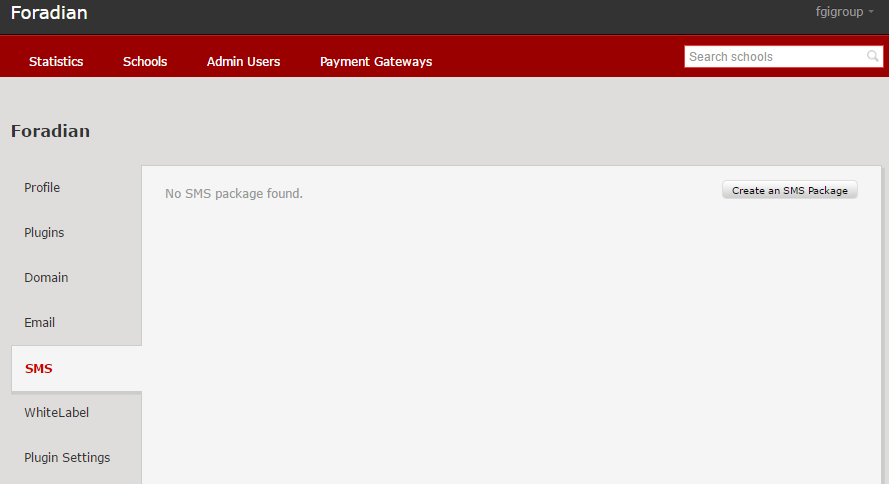
Your SMS Package can be configured in ‘SMS Setting’ option under company details of the multischool panel. On clicking ‘Create SMS Package’, the details can be entered into Fedena.  SMS package details and parameter mapping details are required to go to the next step.

Fedena Multi school erp system screenshot


Fedena multi school erp system screenshot 2


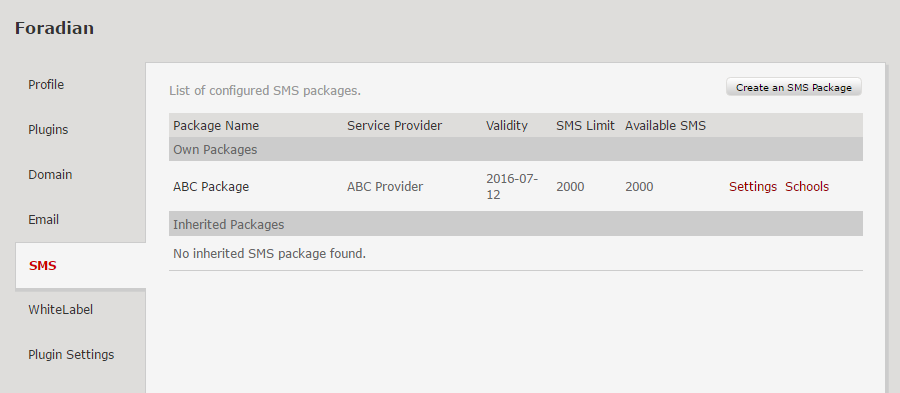
The SMS package details include the following :


  1. Package Name – Enter the name of the SMS package.
  2. Service Provider – Enter the name of the SMS service provider.
  3. Message Limit – Enter the total number of messages that can be sent. If a message limit is not provided, it will be considered as ‘Unlimited’ SMS.
  4. Valid Till – Select the package validity date. When the date passes the validity date, messages cannot be sent. If a date is not provided, it will be considered as ‘Lifetime’ validity.
  5. Character Limit – Enter the total number of characters that make up one message. If left blank, the character limit per message is taken as 160. In some cases, service providers may include a few characters of their own as part of the messages being sent, in such cases, specify the character limit accordingly.


Enter the parameter mapping details provided by the service provider. The ‘sender name’ is the name the recipients will see when they receive an SMS. If you enter a sender name and enable Sender name modification, the sender name can be changed when assigning the package to any institution. If you disable Sender name modification, the sender name cannot be changed.


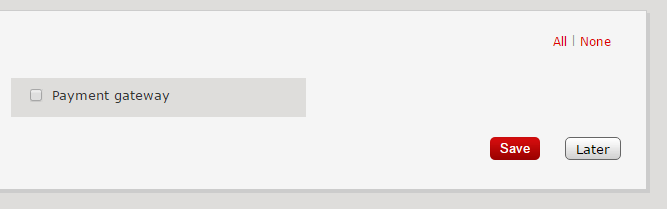
After you have entered all the details, click the Create button. You can assign this package to the institution by clicking on the option ‘Add a school’.


Multi school Fedena erp system screen 4


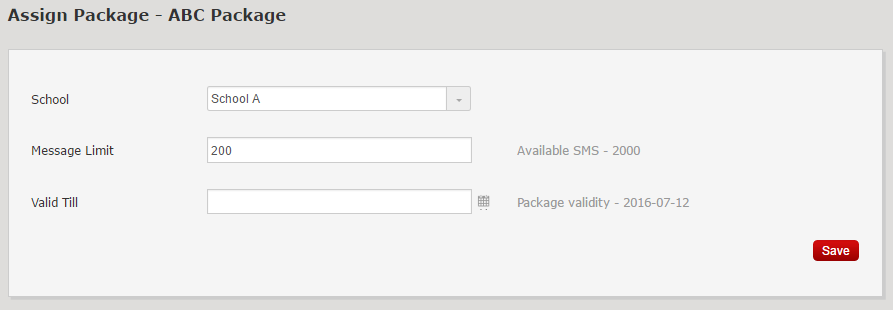
This count will now be reflected in the institution’s login.


That’s how easy setting up your SMS for your group of institutions is. Now let’s get into the analytics Fedena School ERP system provides.


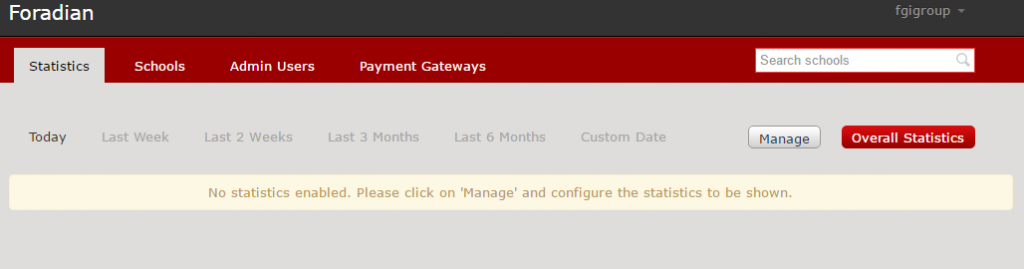
Analytics and the overall data of your group of institutions, all under one roof, Fedena


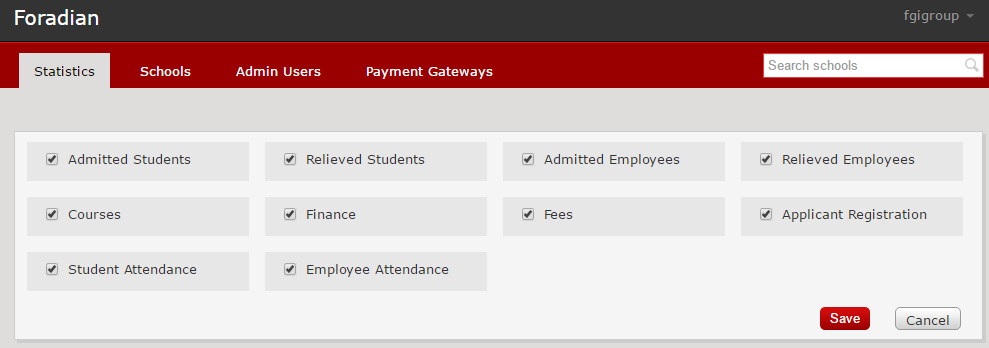
The statistics option gives you the reports for the multischool group institutions. The dashboard shown below is an example of how you can see the information.

Fedena multi school erp system screenshot 5


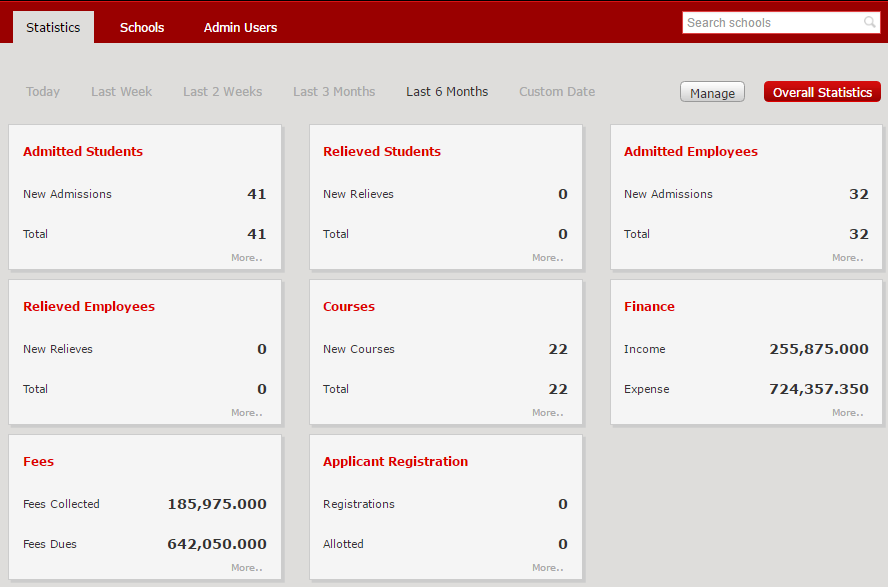
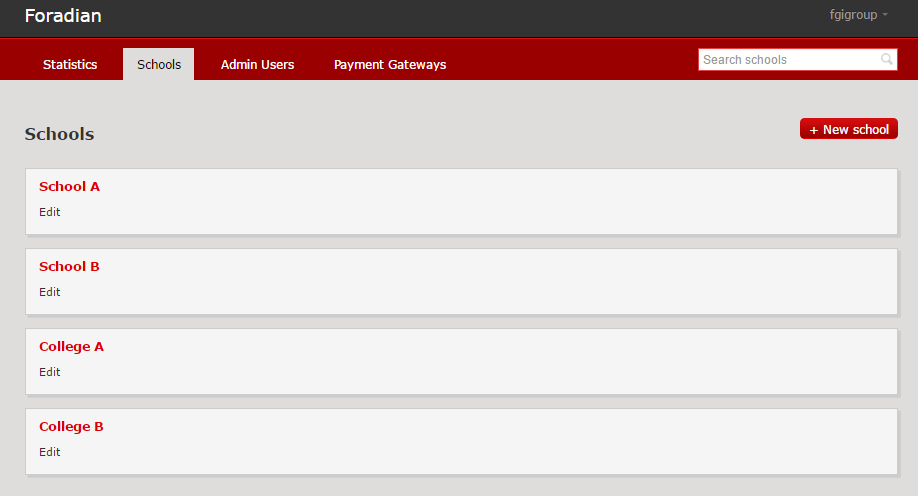
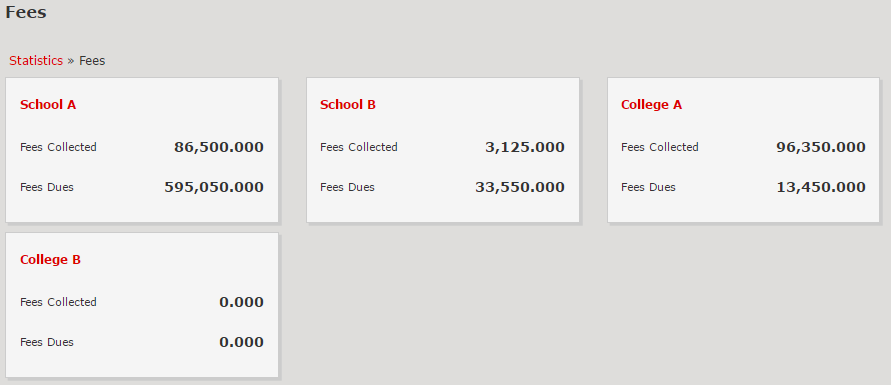
To check the details of each institution, click on ‘More..’ under each module. In our example, for the 4 institutions under the multischool group, data is shown as follows : 


Multi School fedena school erp system screenshot 6


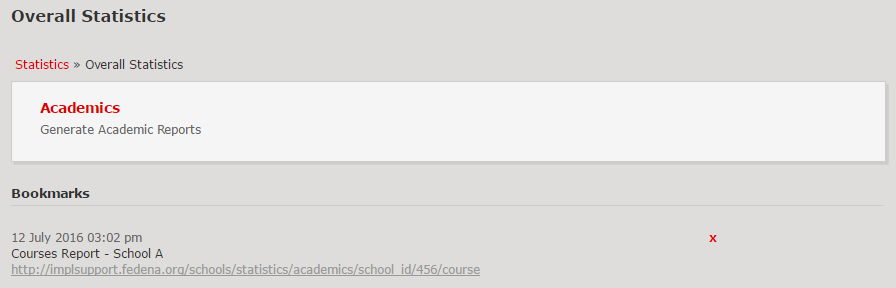
Overall statistics can also be checked and is shown below for each institution.

Fedena multi school erp system screeshot 7


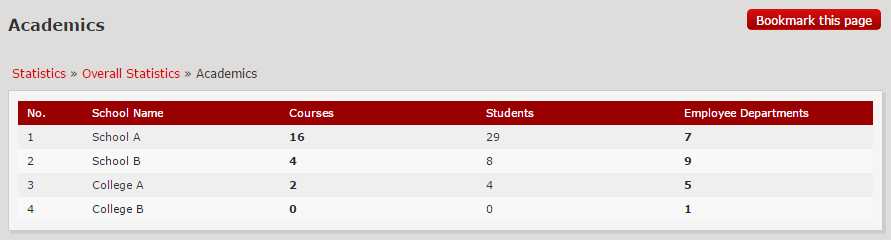
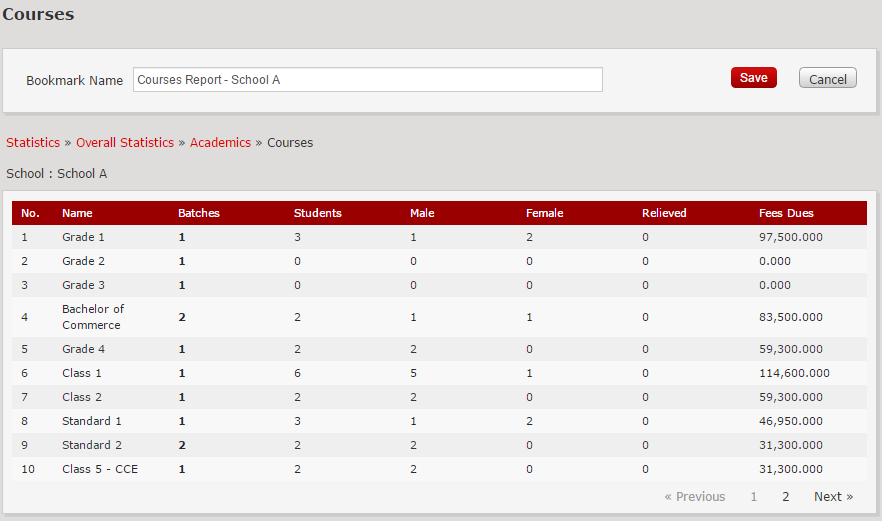
To further check the courses or departments, click on the number. The following details appear : 

Fedena multi school erp system screenshot 8


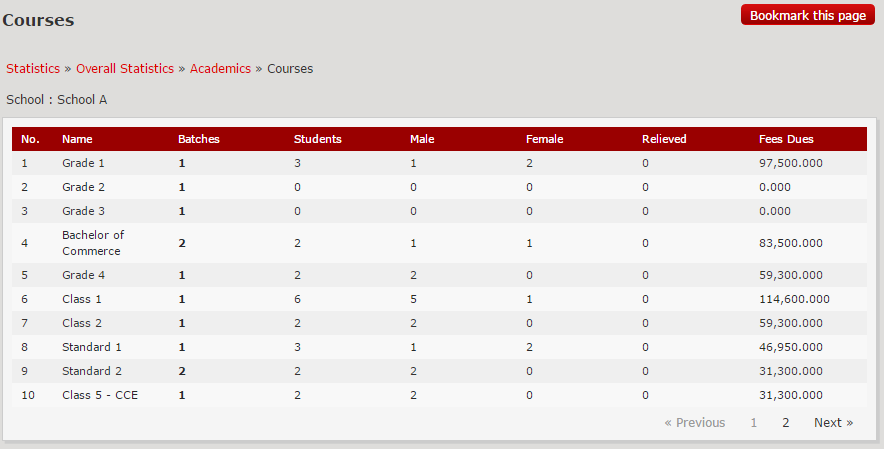
If these details need to be seen frequently, they can be bookmarked, using the‘Bookmark this page’ option.

Fedena multi school erp system screenshot 9


When you revisit the ‘Overall Statistics’ page, the bookmarks can be checked and visited.


Fedena multi school erp system screenshot 10


To get an indepth understanding of the Analytics page you can always get in touch with us. Now let’s see how you can assign multiple admins for your multiple institutions.


Easy management through multiple admin users


Multiple admins can be created in your Fedena Multischool Panel. For this, use the option ‘Admin Users’ and click on ‘New Admin’. Enter the new admin details and Save.

Fedena Multi school erp system screenshot 11


fedena multi school erp system screenshot 12


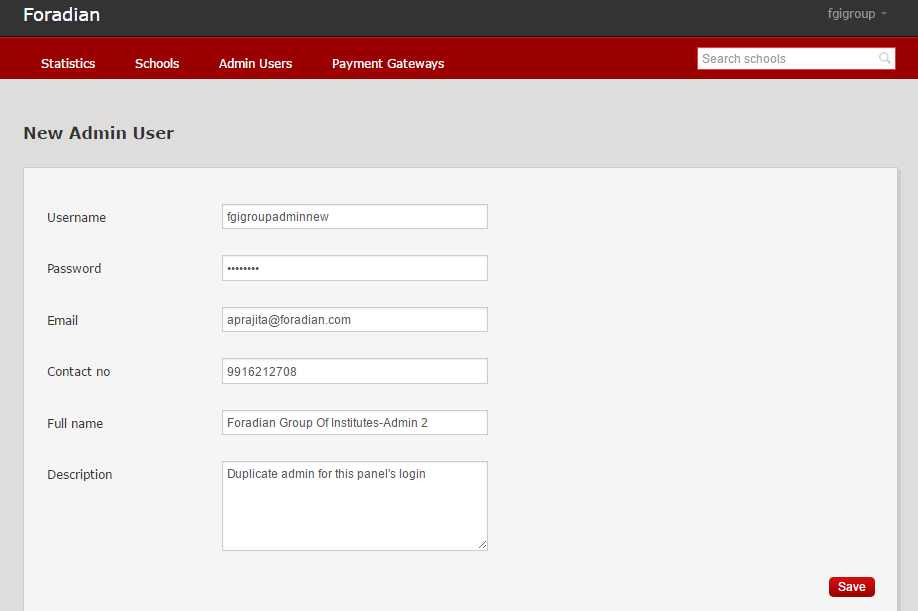
These credentials can be used to login to the panel along with the already created credentials, you can repeat this process for any number of admins you require and you are done.


This brings us to an end of the Multischool Panel blog series. We hope this information will help you understand how Fedena School ERP system helps automates all of your institutions’ processes and gives you actionable insights into growing your institutions, teachers, and students.

Fedena school erp system payment gateway

Payment Gateways, White-labeling & Plugins in the Multi-School Fedena School ERP system

In our previous blog, we discussed how you can setup your group of institutions and institutions in Fedena. Today we will learn how to assign the various plugins you have purchased to each group, assign payment gateways to them and how to white-label Fedena to the name of your organization or group of institutions.

 
Assign multiple plugins to your multischool group

 
Plugins are basically the different modules of Fedena which handle various processes of your institutions, for example, the Library plugin will handle your library operations and processes, the Hostel plugin manages your hostel fees, room allocations etc. The institutions under the multischool group can have access to the plugins of your choosing or the admin you have assigned. These plugins can be assigned/removed under the option ‘Plugins’.
 
Fedena Multischool screenshot

 
Create and assign multiple payment gateways for smooth online transactions

 
Using the payment gateway, Fedena users, like parents, teachers and admins can perform secure online fee payments by methods such as credit cards, debit cards, net banking, and so on. These online transactions with Fedena are handled securely through encrypted channels. The payment gateways can be configured under the option ‘Payment Gateways’.
 .
Fedena multischool screenshot 2
 
While creating a new gateway, you will need the configuration parameters from the payment gateway provider you have hired. These parameters must be entered in Fedena and will be used to map to your payment gateway provider. Multiple payment gateways can be configured and assigned to the multischool group.
 
Fedena multi school screenshot 3
 
To assign, see the ‘Multischool Groups’ option and click on the group title to check its details. Select the option ‘Gateways’ and select option ‘Assign Gateways’.
 
Fedena multi school part 4
 
This will allow you to assign the gateways for multiple institutions for this group.
 
Fedena multi school 5
 
Later, when you create institutions in this group, each institution will have the gateways which  have been assigned.
 
Whitelabel your group of institutions
 
This option allows you to do the following for the institutions under the group :

  1. Customize the “Powered by Fedena” statement at the bottom of the page
  2. Customize the word Fedena

 
Fedena multi school screenshot 6
 
This can be done when you login into the multi-school panel and check the company details. After saving the changes, the same will reflect in the organizations under this group.
 
Fedena multi school screenshot 7
 
This covers assigning plugins to your institutions and groups in Fedena school ERP system along with assigning multiple payment gateways and white-labeling Fedena with your custom institution names. Next week we will learn how to setup your SMS provider settings, assign multiple admins to your institutions and groups and understand all the analytics Fedena provides you at the Multi-school level.

Fedena School ERP system biointegration

Biometric Integration – To help you keep track with minimum effort.

Students and Teachers are the core of your institution, so all data relative to them should be paramount. But documenting such data is a time-consuming task. After all, you don’t want to be misinformed about the students and teachers in your institution or have no idea if a teacher is absent or not for the day.


Fedena Biometric integration


Biometric devices take the complexity and time consumption out of collecting the attendance data of teachers and students in your institution. It’s a technology that lets your institution create data ids connected to the biometric print of every teacher and student. There are a world of possibilities with biometric devices, you can also start using these devices to allow students to automatically pay fees or generate their receipts, you can generate teacher leave applications and reports, allow access to institution infrastructure by just taking a scan of their fingerprints – all with just one device!


The biometric device becomes a lot more powerful when integrated with your local database you use for your institution. By integrating your biometric devices with Fedena, a school ERP system, it instantly connects all the data of the teachers and students in your institution.


Build a seamless attendance tracking feature for your institution, generate fees, leave applications and even attendance reports, without hours of additional work on a daily basis by adopting the biometric technology.


How to setup a biometric integration with Fedena School ERP software


Your biometric device helps you gather and attribute specific data to specific biometric ids of teachers and students while Fedena allows you to populate, maintain and edit the data attributed to every teacher and student, here is a basic setup of your biometric device with Fedena.


  • Each user(students/teachers) in your institution will get a unique hardware ID from the biometric device.
  • You can enter this unique ID in the hardware ID field of the student/teacher profile in Fedena.
  • Install a simple software provided by Fedena school ERP software in the local PC where the biometric device is connected.
  • Once this is done. This software will communicate with Fedena through the internet using Fedena’s attendance API.


Step by step instructions

Step 1
Get the Fedena installation ready. Undergo Fedena training. Enter student and teacher data in Fedena.
Step 2
Get the biometric device installed and connected to your local PC. Make sure the software that came along with the hardware is installed on the local PC.
Step 3
Install the hardware integration app provided by Fedena in the same local PC where the biometric device is connected and the software is running.
Step 4
Enroll the students and teachers in the biometric device as per the instructions received from hardware provider. The biometric device will assign a unique ID to every user.
Step 5
Store the unique ID of students and teachers in Fedena in the hardware ID field.


You are done! You can now track your teachers and students data by just taking their biometric prints. Get started with biometric integration with Fedena for your institution today, just hit the contact button on the top and leave a message and we’ll take it from there.

Fedena School ERP system Multischool

Setting up Fedena School ERP Software – Multi-school panel

For today, let’s begin with logging in to your accounts panel and creating a group and creating an institution. In our previous blog we discussed the advantages of using Fedena school ERP software for your group of institutions.


Fedena School ERP system Multischool


Creating a Group of Institutions as well as Groups of Institutions

Log-in as an admin to the Fedena accounts panel. You can confirm your institution’s details and the number of licences purchased. The number of institutions you can create depend on the number of licenses you have purchased for Fedena. If you have purchased 10, you can create 10 institutions and any number of groups.  


Fedena school erp screenshot multischool


More than one license allows you to create a multi school group with a list of institutions under it. For Example : If you have five licenses, you can create a multischool group called ABC Group of Institutions, and assign any number of institutions you desire as long as it doesn’t exceed five. The remaining licenses can remain as independent institutions or another group or can be added to the same group at a later stage. This way you have multiple groups and each group has multiple institutions. To create the group, click on ‘Multischool groups’ option and select ‘New Multischool Group’, as shown below.


fedena school erp multischool screenshot 2


Enter the details about this group.

fedena school erp multischool screenshot3


The username and password fields are the credentials to the new Fedena school panel which will be created automatically. The Fedena accounts panel now acts as your multischool admin panel for the group of institutes. The number of institutions which should be a part of this group, can be entered in the field ‘License’.


Give a custom name to your multischool panel domain       


After Saving the above settings, the group will be listed under ‘Multischool Groups’ option. To check the details, click on the title of the group. To access the group, check the ‘Domain’ option. A default domain name for this panel will already be assigned. Accessing this domain, you can create institutions (based on the ‘Licence’ field, as entered in the above steps). You can also add a custom domain for this group by creating a cname and pointing the new domain to the server where Fedena is installed.


fedena school erp screenshot 4

Creating institutions under each group


Under the group, multiple institutions can be created. To create these institutions, log-in to the domain of the group using the credentials we just setup while creating the group.


fedena school erp screenshot 5


Statistics are enabled by default for this panel, manage what you want to see, by clicking on the ‘Manage’ button and the information you need will appear on your dashboard.


fedena school erp screenshot 6


To create an institution under this group, click the option ‘Schools’ and click on ‘New School’.


fedena school erp screenshot 7


Enter relevant details in the form.


fedena school erp screenshot 9


Check that the school code is prefixed to the domain name. This domain name is shown as per the white label settings which we will be seeing later in the series of blogs. Using this domain, the institution’s users like admins, employees, students and parents will be able to access Fedena The list of plugins shown here are dependent on the assigned plugins for this group. Assign plugins that are required by this institution and don’t forget to save before you exit this menu.


multischoolpart2-10


The institution created will now appear under the ‘Schools’ option in the dashboard. To view/edit the details, click on the School’s title. You can assign payment gateways to this school by checking the option ‘Gateways’. If email settings are not inherited, the same can be entered under ‘Email’ option which we cover in our next blog.


To create another institution, just follow the above procedure to create multiple institutions and all of them will be listed under the ‘Schools’ tab in your group dashboard. In the image below, the multischool group has 4 organizations – 2 schools and 2 colleges.


multischoolpart2-11


This should help you get started with setting up your group of institutions. The advantage of using Fedena as a multi school platform is to have all your data in one place with actionable insights to your finances, resources as well as important institution metrics.


Fedena School ERP Chat Support

Fedena Chat Support is here!

August 15, The Indian Independence day, what better occasion to unveil a new feature for our very successful Fedena School ERP partners and clients. We have always striven to give you the best possible support, our support team is constantly engaging with your institution’s admins and Fedena users via multiple support channels like our dedicated support portal, Email support, phone support, video conferences etc. To add to this list, today, we are proud to be introducing a chat support. Our aim with developing the Fedena support experience is to provide a completely seamless and efficient support to everybody.


As a pilot run, Fedena chat support will be available throughout the week (Monday – Friday) from 9:00 AM – 6:00 PM IST (3:30 AM – 12:30 PM GMT). You can access it by visiting our support portal. If you are worried about ticket raises and other processes, the live chat is integrated with our support portal and these chats can easily be converted to tickets, helping us as well as you to resolve any issue at lightening fast speeds. We have also made sure that the chat is routed to the same support agent you were already in contact with, helping us make the partner – agent communication seamless.


Here’s a peek at the new Chat on our support portal :

Fedena School ERP screenshot support


Fedena chat support screenshot


Fedena school ERP support chat screenshot


If nobody is online, we’ll get back to you as soon as possible :


Fedena School ERP Support Chat


We feel that this will greatly benefit our partners & clients who need immediate support. Partners who need quick clarification or encounter a showstopper bug can use this feature to resolve the issue at the earliest rather than writing an E-Mail and waiting for a response. The introduction of chat to our support arsenal will greatly enhance customer experience and make it an independent, seamless and easy process.


Fedena School erp multi school system

Fedena School ERP System – The secret power to Multi-school management.

Fedena School ERP Seva Sadan Testimonial


Managing a school/institution is equivalent to running a tight ship, but managing a group of schools/institutions is just the tip of the iceberg. After constantly taking feedback and updating our Fedena accounts panel, we are glad to say that we have successfully identified key features that admins for a group of institutions would find very helpful. To give you a better understanding of the features in the accounts panel and how they can be applied, we will be releasing a series of blog posts describing features and their applications to your institutions’ administration.


In today’s blog, we give you an overview of the Fedena accounts panel to our school ERP system, access to it, the list of features and it’s advantages. If you have already subscribed to the Fedena demo ( If you haven’t yet, you should!) or made a purchase, you would have got an email with various links and their respective login credentials. To access the Fedena accounts panel, you will have to click on the link below :


    accounts.fedena.com


Before we go ahead and log in, let’s first list down all the different features and the links to their functionalities below
 
Fedena Multi school management system
Creating a Group of Institutions as well as Groups of Institutions.
Creating institutions under each group.
 

Fedena multi school management system part 3
Plugin assignment for institutions.

Rebranding Fedena.

Configuring Payment Gateways.
 

Fedena multi school management system part 4
Setting up your SMS settings and Assignment.

Analytics and Reports.

Multiple Admin profiles with customized accessibility.


The Fedena accounts panel comes with a useful feature that allows you to rebrand your platform to show customized branding elements for each institution. We will discuss all of these features in detail with examples and screenshots over the next few weeks. For today, let’s discuss


The advantages of Fedena School ERP system for Multi-school management
  • One dashboard to manage and track all your institutions.
  • Track what you want, when you want, how you want.
  • Rebrand Fedena to your Institution’s Brand.
  • Easily configure online payment options for independent as well as a group of institutions.
  • Involve more admins at different levels by allocating accessibility to the Fedena accounts panel.
  • Choose SMS settings as well as email settings easily for all the institutions in your group without the hassle of setting them up separately for every institution.


If these reasons aren’t enough to get you started with Fedena School ERP system for your group of Institutions, look out further for this space as we go in-depth into describing the various features the Multi-school management panel from Fedena offers and how it best fits and automates your group of Institutions.

Namaka : Fedena 3.5.1

Namaka

Fedena 3.5.1 is all geared to be the number one school management software. Namaka, our latest update on Fedena is finally out today! Though it’s a small release it’s loaded with a tonne of powerful updates and fixes. These updates and fixes come from your generous feedback. Let’s dive into the updates that are rolling out today and also see what’s brewing in our labs for release up ahead.
 
In this age, we might find it hard to imagine a time where girls were forced to stay at home and married off at a young age, but it is due to a few forgotten heroes who brought about change in the society by small yet powerful steps against many odds. We remember the trailblazer who made this happen and dedicate this release – Fedena 3.5.1 to her,  Savitribai Phule . She was born in 1831 in Maharashtra and was an early social reformer and poet. A lifetime educationist, she championed the cause of education for young girls and widows by opening India’s first women’s school at Bhide Wada near Pune, India around 1848. She used poems to get her message of education and equal rights across the country and the world.
 
What’s New in Namaka

  1. Examination Report Settings
  2. Auto Logout Feature
  3. Inventory Tax Settings

 
What’s Updated in Namaka

  1. Menu text link beside the Menu icon
  2. Finance module
  3. ICSE Report Card Design

 
Examination Report Settings

After integrating all the feedback we have received, we decided to bring in customizability to the reports.  You can now assign the settings for the exam reports using the Report Settings in Fedena. This option allows an admin or a privileged employee to manage & customize fields, header sections, grading levels and the signature section in a report. The report settings can be assigned to courses following Normal, GPA, CWA, CCE and ICSE type of grading system, basically all the grading systems Fedena supports.  


Auto Logout Feature

A feature which is the most important for the security of your institution’s data is finally up for release with Namaka. The Auto logout feature in Fedena, automatically logs the user out depending on the time of inactivity within Fedena. This feature can be enabled from the General settings tab of the admin with the admin having the privileges of determining the amount of time of inactivity after which Fedena will automatically logout the user.
 
Inventory Tax Settings

You can now apply discounts to your school/institution inventory purchases making it easier to calculate the taxes and discounts. The update comes as two modes :

  1. Before Discount mode
  2. After Discount mode


These modes help in calculating discounts on Invoices, GRNs and Purchase Orders either before calculating tax on them or after calculating tax on them, allowing you to apply and manage the tax calculations easily.
 
Menu Text Link in Fedena  

The menu icon in Fedena has always been on the top left hand corner and more often than not from your feedback about there being no markers as to it being a button or not, it has often gone unnoticed at the first glance for many users including admins. To erase this confusion and enhance your experience with Fedena we decided to that a text “Menu” should be accompanying the menu icon. Here is a look at before and after :

Menu


Finance Module Update – Fee Revert Reason

The update in the finance module is a much awaited one as it was high on the feature requests in the feedback. With this new update we have included a text box to record the reason for the revert of the fees. You can also track the reasons for reverts in the reports section.


ICSE Report Card Redesign

The old ICSE report card in Fedena wasn’t really the optimal use of space and couldn’t include all the subjects in one sheet and looked a little too cluttered. The new update brings a change in layout accommodating all the various subjects, overall scores and reducing the space used to print these, this gives you a better viewing as well as saving paper on printing the reports.

ICSE Fedena school management system report card
 
Sneak Peak into what’s up ahead!

Our team is already working on a host of new features that will enhance your experience with Fedena. A customizable Transfer Certificate Generator, Automatic Timetable Generator and a powerful HR Reports module are some of features that are getting primed in our labs. The features you have requested will soon be live in Fedena, the number one school management system.

Fedena 3.5.1: Namaka – Release Notes

Fedena 3.5.1 Release note

What’s new in Fedena

Here is the list of new features included with this release of Fedena 3.5.1

Feature Description User Role Module
Examination Report Settings Examination Reports can now have custom fields in the report card like Roll Number, Father’s or Mother’s name, Date of Birth etc. Institutions can now choose between the default Fedena header and a pre-printed letterhead. The signature labels can also be customized and institutions can choose upto 3 labels. This is applicable to student wise reports in Normal, GPA, CWA, CCE and ICSE reports. Administrator, Privileged Employee Examination
Auto Logout You can enable auto logout on inactivity from the general settings page. When selected, you can specify the time after which inactive users should be logged out and the user roles for which it should be enabled. Administrator, Privileged Employee All modules
Inventory Tax Settings Now you can select if discount is to be applied before or after the tax is calculated using the modes -Discount before tax or Discount after Tax. Administrator, Privileged Employee Inventory

What’s enhanced in Fedena

Here is the list of enhanced features included with this release of Fedena 3.5.1

Feature Description User Role Module
Revert Reason in Finance In order to track the reason for reverting all finance transactions – Income, Expense, Donation, Academic Fees, Transport, Hostel, Instant Fees and Library, a text field has been added. This reason is shown in the reverted transactions report page with option to take export as PDF and CSV reports. Administrator, Privileged Employee Fees, Finance, Transport, Hostel, Instant Fees, Library
Menu Link Text The text ‘Menu’ has been added near the menu button to provide more clarity to users. Administrator, Privileged Employee, Student, Parent All modules
ICSE Report Card Redesign The ICSE student report is redesigned to hold many subjects in one sheet of paper. Administrator, Privileged Employee, Student, Parent Examination

Issues Fixed

Here is the list of issues fixed in this release of Fedena 3.5.1


Examination

  • No validation for maximum and minimum marks in examination
  • Assign IA group and assign IA weightages shows subjects from inactive batches
  • ‘Select All’ option not available in ICSE generate report


Timetable

  • Manage subjects: Show timetable class slots instead of subject weekly class
  • Work allotment shows subject hours instead of total employee working hours


Finance

  • Finance income report does not show the category name
  • Finance expense report does not show the category name
  • Wrong date in inventory transactions finance report
  • Incorrect fee shown in the profile.


Library

  • No validation in library manage tags page.


Blog

  • Pagination not working in blog comments


Instant Fees

  • Error while reverting instant fee transactions


News

  • News comments show blank pages with pagination links for students


Reports

  • No data shown in course/batch report on sorting by student wise.

Easing your Finances with the new Fedena 3.5

3.5 version of Fedena brings you a new redesigned Finance reports section. Functionality wise, the reports are the same, but the report’s design has been updated for better usability. The user can now see the various incomes and expenses of the institute, under multiple layers. For Example, let’s suppose the accounts manager wants to know the total expenses in the month of May, or the total expenses of the Mathematics department in the month of August, or the Total income generated in the first 10 days of January from a particular batch, or say the Accounts manager wants to compare the income – expense for two different time periods, all of the above are now possible in the Finance reports section of the new Fedena 3.5 school management system.

To see how we have enhanced the Finance reports section, let’s take a few scenarios and see it’s benefits for your finance department.
 
Scenario 1: Management wants a report from the Accounts department on how much is the Income from the sales of Inventory (Books, Sports goods, stationery) this year is compared to the last.

Now this can be easily obtained from the compare transactions section under Finance reports in Fedena.
• Go to Compare transactions and give the date range (last Financial year and This financial year).
• Report comparing income and expense under different categories is generated like the one below

Fedena school management system finance module


Scenario 2 : There is dispute on one of the Fees collected, the guardian raises this issue after a period of three months to the school management. School management needs to show the details to the parent/guardian.

  • Go to ‘Fee Receipt’ section under Finance reports
  • Search for the Fee receipt number for which the dispute has been raised.
  • All the details related to that Fee paid will be available on the page.

These details can be printed or taken as a PDF and can be shown to the parents/guardians to discuss on who collected it, the calculation done to compute the fee and all the other details collected at the time of Fee collection.

Fedena school management system finance module screenshot
 
Scenario 3 : The account manager is not sure about the mismatch with the income and expense for a particular month.

  • Just navigate to the transactions section under Finance reports
  • Give the month or time period for which the details seem mismatched.
  • Once the time period is given, all the income and expense to the institute will be shown.
  • Not just that, but every income and expense will be shown under different heads. Say Income can be from student fee, donation, selling of stationery and books etc. Expense can be salary, buying furniture for the institute etc.
  • So once this report is generated, the accounts manager can pinpoint exactly where the mismatch happened.
  • Suppose the income from Fee collection is not matching the actual income, the accounts manager can also go deeper into each fee collection and check where the mismatch happened. This helps in finding the exact mismatch fee collection.

Fedena school management system finance module screenshot


Fedena school management system finance module screenshot 4


These basic scenarios are just a few examples of how the finance reports are handy for the Management or the Accounts department or even for the students/parents, you can always find other benefits of the new upgraded finances in Fedena 3.5 school management system. These readily available transparent finance interactions are one of the best ways to ease communications for institutions with parents/guardians, sellers in financial matters.

Managing Leaves and Payslips in the new Fedena 3.5

Human Resources module has undergone a major revamp in 3.5 version of Fedena to enhance usability and user experience to continue being the number one school management system. The main changes are in the leave management and payslip processing modules.

Leave Management Update

Earlier version of Fedena did not support applying extra leaves apart from the leaves applicable for a particular employee. Suppose if the employee has taken 10 out of the 10 sick leaves available and no more leaves are available, earlier it had to be marked manually by the HR manager. Now the employee can apply for additional leaves which can be accounted as either paid leave or Loss of Pay. The additional leaves applied by the employee will be notified as additional leaves to the manager.
 
The new version of Fedena gives the flexibility of defining the number of working days in a month or in a week or bi-weekly. This helps in generating payslip for a particular period. In the previous versions, payslips could only be generated monthly. With the enhancements, an institute can calculate and generate weekly, bi-weekly or monthly payslips. The days can be defined by the institute as per their policies.
 
School management system leave dash - Fedena
 
Different types of leave can be defined in Fedena and for each of them different attributes can be given. When a leave type is added, the admin/HR Manager can define if the employee exceeds that particular leave type, and is counted as loss of pay or not. Admin can define the total number of leaves in that particular leave type. Whether this leave can be carried forward or not can also be defined in the leave settings.
 
School management system leave dash
 

Payslips Management Update

One of the other major changes that was implemented in 3.5 version of Fedena was the multiple type of payslips. In an institute, different categories of employees can be working on an hourly basis, on a weekly or monthly basis. The payroll for them will differ based on the type and category in which they fall into. All these factors were taken into account and multiple categories of payroll/payslips was implemented in the newest version of Fedena.
 
When defining a payroll group, these different complicated aspects are taken into account. The administrator of the institute can define the Payroll group name. For an example, The administrator wants to put all the Bi-Weekly salaried employees into one payroll group. Admin can create a payroll group ‘Bi-Weekly Employees’ and define the values applicable to those employees. Admin can select the frequency of payslips (in this case Bi-Weekly), The payslip generation date (Any day on the week can be selected). If Loss of Pay is applicable for this payroll group; it can be defined. The admin has different options to define the LoP. This can be defined as a particular numeric value or a part of different component of salary etc.
 
School Management system payslip dash
 
The fields to be shown in the payslip can be defined by the Admin or privileged employee (those who have access to HR module payslip settings). The details to be printed can be selected as per the need of the institution. Whichever field is not needed to be printed can be deselected.
 
School management system payslip dash
 
With the new enhancements users will find it easy to administer most of the HR processes in an institute. Working days, Payslips, Extra leaves etc can be easily defined and processed with the new 3.5 version of Fedena.

Fee payment in Fedena 3.5 through mobile

Fedena 3.5 Fee Payment Mobile


There were 1.5 Billion smartphone users in 2014 and that’s expected to grow to 2.5 billion by 2019. While computers/desktops are 1.6 billion in 2015 and expected to reach 2 billion by 2019. Smartphones are replacing traditional desktop and laptops at a rapid pace. Users are getting aligned to using smartphones day by day. The growth in smartphones has made service providers develop mobile-centric user experience for users. Fee collection and payment is one of the most used features in Fedena and we couldn’t ignore the feedbacks from our customers to make Fedena more mobile friendly.


In Fedena 3.5 we have incorporated fee payment through mobiles. Students and parents can check their fee details, pay fees online, and print the fee receipts–all from their mobile phones. Through the mobile, fees can be paid on the go and unlike the desktop or laptop which demands a working space. This makes fee payment easier for parents / guardians. In case a parent is abroad and travelling and it’s the last date of fee payment, in such a scenario that parent can pay the fee with the help of this module. The user interface of fee payment in Fedena is completely mobile friendly so that users have a hassle free experience.


How does one make an online fee payment?


There are four login options in Fedena. Administrator, Employee, Student, Parent. Fees can be paid by either logging in as a student or as a parent. Once you login to Fedena with your login credentials, you can see the following screen


Fedena 3.5 Mobile payment page


The Fees section in the home page will show the total number of unpaid fees. Click on Fees section, you will be able to see the fees you have paid and which you haven’t.


Fedena 3.5 Fees page


Fedena 3.5 Unpaid fees page


Now once you know the fees to be paid, you can check the due date of each unpaid fee. Now fee can be paid for each fee separately. It is to be noted that all the multiple unpaid fees cannot be paid at one go. You have to pay each fee separately. Click on any unpaid fee and you can see a screen as shown below


Fedena 3.5 Payment portal page


Click on ‘Pay Fee’ button which will direct you to the payment page. Here there are multiple options for payment. You can pay via net banking, using your credit or debit card or an online wallet, currently Fedena 3.5 supports PayPal, Interswitch, Authorize.net, Stripe, Braintree, PayU, and CCavenue. Once the payment details are given, payment will be credited to the institute and the fee will be shown under ‘Paid’ category.


Online payment is very helpful for parents and students so that they can avoid long queues in school, save on travel time to the institute, hassles of cash transaction etc. Moreover, as smartphone usage goes up, we are sure that this feature will soon become the most used by our users.

Print Less with More only on Fedena 3.5

Fedena 3.5 is now optimized for Dot Matrix printers and Thermal printers to save cost and prevent wastage.


For any institution or organization, one of the many challenges is the management of fee receipts generation and printing. From the cost of the ink to the number of receipts being printed, the institution also has to make the choice of the printer they would like to use for this process. The number of printers available in the market with different technologies and under various brands is another concern while making a decision. It becomes equally difficult for Institutions to find the correct fee generating software which comes with an option to facilitate all of these various printers. With this in mind, we got started on an update in Fedena for the Fee receipt generation module which would facilitate all these various printers for your Institution.


Printing Problem at hand


Fee receipts, which is one of the most widely used features in Fedena had only A4 sheet laser printing option prior to our 3.5 update. As the amount of fee receipts being printed was huge in every institution, there was a concern of consumption of papers for each receipt. Another concern that institutes shared was usability across multiple printers based on their technology. Before the Fedena 3.5 release, Fedena only supported laser printers. But after understanding that many institutes still used the dot matrix printer, we had to facilitate a solution for all our users.


Here’s what we did in the 3.5 version.


You can set your printing preference under the Fees section in Finance module. Admin or privileged employee can perform this task. Under the Fee section, there is a Fee receipt settings where the printer settings can be configured.


Fedena Fee Printing Module


The user can select the printer type and the print sheet size. In Fedena 3.5, Fedena now supports multiple printer types. The first option ‘Normal’ covers Laserjet, Inkjet, Deskjet etc. These are the most common type of printers used in institutes now a days.


Inkjet


Many institutes still use dot matrix printer and from the constant feedback from these institutes we have included the dot matrix printer support. The dot matrix printers are slowly getting replaced by thermal and laser jet printers across the globe but until they do get replaced, support for such technology is still paramount.


Once the printer type is selected, the page size can be chosen. Fedena 3.5 supports A4 and A5 page size. A4 is available in portrait mode only.  A5 can be printed in portrait and landscape mode. Once you select the printer type and page size, Fedena will give you a preview of the print page. This we think is one of the features that will help our users  decide on which printing pattern to select.


Another additional option the user can select is whether to include the default header or to go with a customized header format. Default header is usually selected when the receipt is printed on plain paper. Fedena will generate the header with the given school name and other details. If the header is printed on the letterhead of the institute, then the customized header option can be selected. The option to preview the print page once the header options are selected are available to finally allow the user to print the receipt.

FeeReceipt_BlogScreenshot


Including receipt printing using Thermal printers is one of the main highlights of the 3.5 release. Thermal printers are replacing the dot matrix and laserjets in institutes. Not only in institutes, most point of sales (pos) use thermal printers. Main advantage of Thermal printers is the reduction in paper consumption. The amount of paper required is very less compared to dot matrix or laserjet/inkjet printers.


thermalprinter


We @Fedena are hopeful that users will like this new feature of selecting multiple printer types and printing options and would squeeze the maximum benefit out of it.