All you need to know about student admission numbers in Fedena

All-you-need-to-know-about-student-admission-numbers-in-Fedena2

Admission numbers are unique numbers allotted to students on their admission. No two students can have the same admission number in the institution, even if they are admitted to a different course or batch. Admission number may also be referred to as ‘Registration Number’, ‘Student ID’, or ‘Student Number’ in many institutions.

Where do I allot an admission number?

When admitting a student using the Student Admission form (Module access icon > Academics > Students > Student Admission), Admission number is the first field you will see at the top of the form. The Admission number field is a mandatory.

Auto Increment of Admission Numbers

Since every time a student is admitted an admission number must be allotted, institutions can choose to auto increment the admission number. This setting can be set by selecting the Enable auto increment of Student Admission No. checkbox on the General settings page. The first admission number will have to be manually entered according to the convention the institution intends to follow. From the next admission onwards, the number will be automatically incremented. For example:

  • If the first admission number is 1, the following admission numbers will be 2, 3, 4, and so on.
  • If the first admission number is A1, the following admission numbers will be A2, A3, A4,…A9, A10, A11, and so on. The alphabet ‘A’ will remain constant.
  • If the first admission number is 1A, the following admission numbers will be 1B, 1C,…1Y, 1Z, 2A, 2B…2Y, 2Z, 3A, 3B…3Y, 3Z, and so on.
  • If the first admission numbers is A, the following admission number will be B, C, D,…X, Y, Z, AA, AB,…AY, AZ, BA, BB…BY, BZ,…CA, CB,…CY, CZ, and so on.

If the Enable auto increment of Student Admission No. checkbox is not selected, you will have to manually enter the admission number every time a student is admitted.

Naming Convention

Institutions can follow a naming convention when creating admission numbers. Make note that admission numbers can only contain alphanumeric characters, underscores, and hyphens. Here are the conventions followed by some schools and colleges that use Fedena:

  • School 1 – Year of joining + a unique number. So the student admission numbers looked like this: 150001, 150002,…150067, 150068,…150666, 150667, and so on.
  • School 2 – School name abbreviated + a unique number. So the student admission numbers looked like this: DPA0001, DPA0002,…DPA0067, DPA0068,…DPA0666, DPA0667, and so on.
  • School 3 – School name abbreviated + a unique number. So the student admission numbers looked like this: DPA1, DPA2,…DPA67, DPA68, DPA666, DPA667, and so on.
  • College 1, for students of a particular course – Year of joining + Course name abbreviated + a unique number. So the student admission numbers looked like this: 03ZOO01, 03ZOO02,… 03ZOO44, 03ZOO45.
  • College 2, for students of a particular course – Year of joining + College code provided by the university it is affiliated to + a unique number. So the student admission numbers looked like this: 15045201, 15045202…15045244, 15045245.

Is there a quick way to allot student admission numbers?

The easiest and quickest way to create many student records in Fedena is to Custom Import the student admission records. When setting up the CSV file to be imported, enter the admission number for each student according to the naming convention your institution intends to follow.

Admission Number = Fedena Username

The student admission number is also the username that a student will use to log in to Fedena. It is important for students to remember their admission number. Many institutions may also ask the students to mention their admission number in any type of communication with the institution.

Can I change a student’s admission number?

Generally the admission number of a student remains unchanged till the student leaves the institution. However, if the admission number of a student needs to be changed, it can be done at any time from the student’s profile by the Administrator or a Privileged Employee. Students cannot change their admission number from their Fedena login.

Can I allot the admission number of a deleted student to a newly admitted student?

Yes, you can allot the admission number of a student who you have permanently deleted from Fedena to a newly admitted student.

Applicant Registration Plugin

The Applicant Registration plugin allows students to register to courses online. When a student is allotted to a batch of a course, the admission number is automatically allotted. The admission number follows the naming convention of the last admitted student, regardless of whether the last student was admitted to the same batch or to a batch of a different course.

Student Reports

Student admission numbers appear in all student reports including attendance reports, examination reports, course/batch reports, and fee receipts.
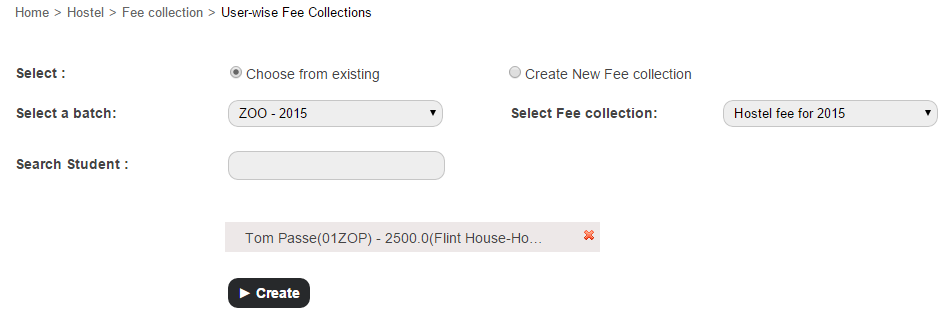
Searching Students

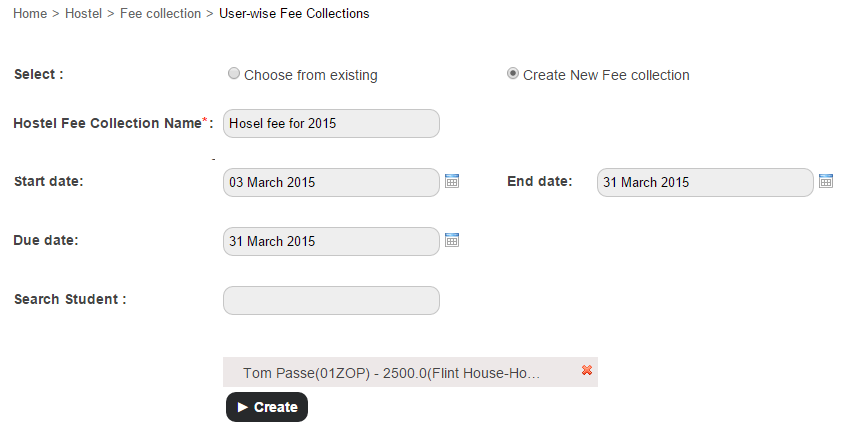
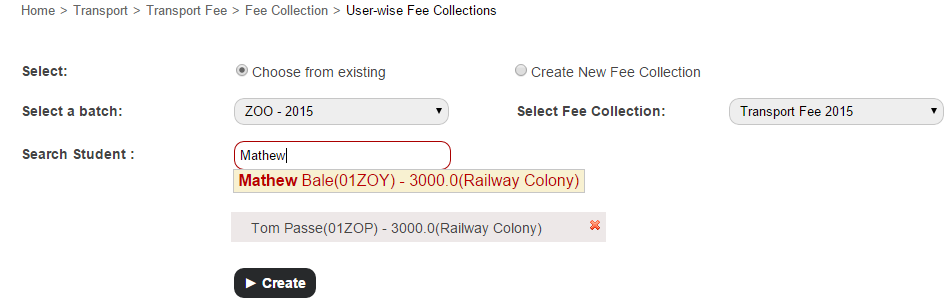
In Fedena, you can search for students from several areas based on your user role and privileges assigned. For example, you can search for students using the search bar at the top of your dashboard, when managing user accounts, when scheduling fee collections, when allotting transport, and many more. Apart from using the name of the student to search, you can also use the student’s admission number to search.

Let us know in the comment section if your institution uses a specific naming convention when allotting admission numbers.

Technology in Schools: What are the Opportunities and Challenges

Technology-in-Schools

See around and you find how technology has changed the way life is today. The same is with technology in schools- it has opened up a lot of opportunities for sure. The adoption of technology in schools has a different picture to offer in different countries. While some developed countries like the United States are looking for more technology to integrate in their schools, countries from the lesser developed parts of the world are still struggling with how to integrate technology in schools. While, there are lot of opportunities that technology has to offer to education institutions at all stages, there are some shortcomings that’s preventing widespread acceptance of technology in schools all over the world.

Opportunities are wide for technology in schools

When you talk about the opportunities for integrating technology in schools, we can actually see how technology is already transforming the way teachers teach in schools- a drift from text-based learning to something that would involve and engage students in the best possible way. Opportunities are plenty; here, we talk about four such opportunities that have every potential to take education to the next level.

  • A global learning platform is surely one blessing bestowed with the introduction of technology in schools. Students can opt to learn foreign language from natives of the particular country through videoconferencing. A lot of websites have come up with this kind of learning sessions via video conferencing call, letting students experience educational benefits minus the travel cost involved.
  • A paperless classroom is on the way. Cloud-based apps and tools like Google Drive, Gmail, Google Docs have a smarter way to offer to students and teachers to carry on their daily classroom learning. A definitely affordable option to save more time than the traditional methods of classroom teaching.
  • A great opportunity for technology in schools lies in the form of virtual reality (put the backlink to our blog)in classroom. Virtual reality has the power to transform classroom into a practical field for students to experience real life applications in a virtual world.
  • E-books have huge potential to change the face of education in the coming days. A lot of schools from different parts of the world have already discovered the huge potential of e-books, yet, some schools remains unaware.

There are challenges too!

The introduction of technology in schools is surely not an easy road to success. It has its share of bad patches which are to be met with.

  • Coming out of the comfort zone and accepting technology in schools is perhaps one of the biggest challenge to face with. Most of the times, teachers and school authorities are reluctant to experiment with new technologies in classroom, for they consider these experimentations are beyond their job descriptions.
  • Technology in schools has another setback- most schools are hesitant to implement distance courses, unlike the universities who have already joined the bandwagon of online courses.
  • The costing factor is always a prominent challenge for the adoption of technology in schools. Most schools do not have the funding to support the use of technology in schools. There is an initial cost involved in the purchasing and installation of technology. Moreover, the cost of maintenance, upkeep and upgradation involves an ongoing cost, which is, at times, financially unsustainable for most K-12 schools.

There are challenges to face; but the biggest test is to face these challenges, overcome and accept technology in schools and revolutionize education with improved opportunities for students.

How Timetable has Evolved to Become One of Fedena’s Most Used Modules

EvolutionOfTimetable


From inception to date, Fedena’s Timetable module has been helping schools and colleges of various sizes schedule and manage timetables. The Timetable module has evolved since Fedena’s inception in 2009. After three major Fedena releases, a number of minor releases, many enhancements, and bug fixes, the Timetable module has come a long way. Thanks to our customer feedback and employee input, we have been able to enhance the experience for our users with every release.

How good it used to be

When Fedena was introduced back in 2009, the Timetable module was one of our major selling points. Then, the Timetable module allowed institutions to create only one timetable. This timetable had to be followed by all batches in the institution. This meant, for all batches, every period had to begin and end at the same time. Though institutions liked how easy it was to create a timetable, it soon became a challenge when each batch had different period timings and needed their own timetable.

For those of you who have been with us from the start, here’s a hazy image that might bring back some good memories, and some not so good ones as well.

1

A point I must add, from the very beginning, Fedena’s user experience has always been one of our top priorities. Even back then, the Timetable module was easy to use and included the smooth drag and drop functionality what you see today.

How better it became

With releases that followed, the Timetable module quickly evolved. Soon features such as the ability to create a timetable for each batch, define the workdays in a week for each batch, together with a few cosmetic enhancements were introduced. By now the Timetable module was gaining popularity among users. This is what the Timetable module looked like back then.

2

Then, with the release of Fedena 3.0, we introduced the concept of ‘class timings’. Class timings allowed institutions to define the number of periods and the duration of each period in a workday. The class timings were then automatically applied to all workdays of the week. Though this gave institutions a little more flexibility when creating timetables, it later brought about the question of ‘What if for a batch, periods begin and end at different times on each workday?’

The best yet…

As an answer to that question, we introduced ‘class timing sets’. Similar to the concept of ‘class timings’, a ‘class timing set’ defined the number of periods and the duration of each period in a workday. The difference was, institutions were now able to assign a unique class timing set to each workday. This brought about a small change in the workflow of creating a timetable. Here’s the current workflow to create a timetable.

3


In addition to all the enhancements, we also managed to give the Timetable interface a facelift, as seen in the image below.

4

All these features put together now offer institutions even greater control over the timetables they create. Today, Timetable is one of the most used modules by Fedena customers. And to let you in on how we plan to improve the Timetable module, we’re now working on ways to automate timetable generation to enable you create timetables even faster. So stay tuned for upcoming releases.

Introducing Fedena 3.4.2

Fedena 3.4.2 - Article (1)

Today, we are excited to announce our newest release, Fedena 3.4.2 featuring a simpler way to schedule exams, a faster and convenient way to process various student fees, SMS notifications when importing data into Fedena, and many more. In addition to the new and enhanced functionality, we’ve also focused on some key bug fixes directed towards an even better usability for all users.

To highlight some of the new and enhanced features:

  • Save time by scheduling exams for all batches of a course at the same time.
  • Customize the type of donor information you want to capture by adding custom additional fields.
  • In addition to the payment gateways that Fedena already supports (PayPal, Interswitch, and Authorize.net.), Fedena will now also support:
    • Stripe
    • Braintree
    • PayU
    • CCavenue

And to offer you even greater control and flexibility for online payments, you can now integrate any custom payment gateway with Fedena.

  • Enhanced the Continuous and Comprehensive Evaluation (CCE) grading system to keep in line with the Central Board of Secondary Education (CBSE) guidelines.
  • SMS notifications are not just for activities performed in the Fedena interface. Now, send and receive SMS notifications for activity performed through Custom Import and using Fedena API as well.
  • Collect and process all types of student fees, such as finance fee, transport fee, and hostel fee from a single view.
  • Generate the employee attendance report for any date range that you specify.

We hope you are excited as much as we are with the new features and enhancements.

And to make this release even sweeter for us, today Foradian celebrates its 6th anniversary. That’s right! Foradian turns six years old. So whether you’ve worked with Foradian over the past six years or have just been introduced to us, thanks for being a part of our journey.

Write to us at info@fedena.com and let us know your thoughts, questions, and feedback about the release. We would also like you to share how your experience has been with Foradian over the past six years on our Facebook or Twitter pages with the hashtag #ForadianTurnsSix.

Interactive Dashlets – Instant access to the information that matters most

InteractiveDashlets
With an information management system as detailed as Fedena, you are going to have all kinds of data coming from different parts of your institution. This can sometimes make tracking and reviewing of information difficult, especially when certain types of information needs to be monitored frequently. So make things easier for you, we introduced Dashlets.


So what exactly is a dashlet? A dashlet gives you a quick overview of the information that matters most to you—like your institution’s income and expenses, the timetable for the day, the exam scheduled for the day, and more. The Fedena dashboard features a collection of dashlets that display only the important information generated from its complementary page.


Now, we never stopped there. With the release of Fedena 3.4, we made dashlets even cooler by adding clickable links that take you right to that specific Fedena page, allowing you to act immediately.
Interactive Dashlets

List of dashlets and information users can access

The table below explains what each type of Fedena user can see and do with their dashlets.

NA – Dashlet not available for that user role.

Dashlet

Administrator / Privileged Employee Student

Parent

Absent Students View the names of absent students. Click a student name to view the student’s profile. NA

NA

Admitted Employees

View the names of admitted employees. Click an employee name to view the employee’s profile. NA NA
Admitted Students View the names of admitted students. Click a student name to view the student’s profile. NA

NA

Birthdays

View the names of students and employees celebrating their birthday. Click on a name to view their profile. Can only view the names of students and employees celebrating their birthday. NA
Blogs View the title and author of the blog posts. Click the title to read the blog post and comment. View the title and author of the blog posts. Click the title to read the blog post and comment.

NA

Book Return Due

View the names and details of books you must return. Click the name of the book to go to the View Books page and reserve the book. View the names and details of books you must return. Click the name of the book to go to your profile and view all the books borrowed with their due dates. NA
Discussions View the title of the discussion and name of the user who initiated the discussion. Click the title to join the discussion and comment. View the title of the discussion and name of the user who initiated the discussion. Click the title to join the discussion and comment.

NA

Employees on Leave

View the names of employees who are on leave. Click an employee name to view the employee’s profile. NA NA
Events Can only view the event details. Can only view the event details. Can only view the event details.
Examinations View the exam details. Click on the exam name to go to the View Exam Groups page. Can only view the exam details.

Only view the exam details.

Fees Due

Can only view the scheduled fee collection details. View the scheduled fee collection details. Click on the fee name to pay the fees.

View the scheduled fee collection details. Click on the fee name to pay the fees.

Finance

View the institution’s income and expenses for the day. Click on the link to view all transactions for the day. NA NA
Leave Applications View the names of employees who have applied for leave. Click an employee name to approve or deny the leave. NA

NA

News

View the news title. Click the title to view and comment on the news. View the news title. Click the title to view and comment on the news.

View the news title. Click the title to view and comment on the news.

Photos Added

View the title and a thumbnail of the photo shared. Click the title to view the photo(s). View the title and a thumbnail of the photo shared. Click the title to view the photo(s).

NA

Placements

View the placement details. Click the title of the placement to view the complete placement details. View the placement details. Click the title of the placement to view the complete placement details. View the placement details. Click the title of the placement to view the complete placement details.
Polls View the poll title and the number of votes. Click the title to give your vote.

View the poll title and the number of votes. Click the title to give your vote.

View the poll title and the number of votes. Click the title to give your vote.
Relieved Students View the names of archived students. Click a student name to view the archived student profile. NA

NA

Removed Employees

View the names of archived employees. Click an employee name to view the archived employee profile. NA NA

SMS Sent

View the recipients’ contact numbers and the message that was sent. Click on a contact number to view the SMS log. NA

NA

Tasks Due View the title of the task. Click the title to view the complete task details and reply. View the title of the task. Click the title to view the complete task details and reply.

NA

Timetable View the timetable for the day. Click a subject to view the complete timetable for a batch. View the timetable for the day. View the timetable for the day.

A dashlet is only worth the value of the information it displays. Take a look at your dashlets and let us know if the information they display is helpful to you, or if it can be improved.

Managing hostel and transport fee collections made easy

Schedule--transport-&-hostel


Many of you might recall that when a hostel or transport fee collection was scheduled for a batch, there was no way to assign the same fee collection to a newly admitted student. You would have to schedule a fee collection for the batch of students all over again. We soon realised this can be pretty inconvenient and sometimes frustrating since students leave and join schools and colleges all through the year. So to make things easier for you, with Fedena 3.4, we are providing you the ability to manage hostel and transport fee collections at an individual student level. You can now assign existing fee collections to a newly admitted student or schedule new fee collections for a particular student.

Who can schedule fee collections

Administrators and privileged employees (Hostel Admin or Transport Admin privilege must be provided) can schedule hostel and transport fee collections.

Prerequisites to scheduling fee collections

Hostel and transport fee collections can be scheduled only for students who have been provided hostel and transport facilities. So make sure to allot hostel and transport facilities to all students who require it, and then schedule fee collections.

Schedule a hostel fee collection for a student

As mentioned earlier, you can assign an existing hostel fee collection or schedule a new fee collection for a student.


Assign an existing hostel fee collection to a student


  1. At the top of your dashboard, click the module access icon > Administration > Hostel Fee Collection > User-wise Fee Collections to open the User-wise Fee Collections page.Managing hostel and transport fee collections made easy2
  2. Select the Choose from existing option
  3. Select a batch and a fee collection.
  4. In the Search Student field, enter the name or admission number of the student to search and assign.
  5. Click the Create button.

Schedule a new hostel fee collection for a student


  1. At the top of your dashboard, click the module access icon > Administration > Hostel > Fee Collection > User-wise Fee Collections to open the User-wise Fee Collections page.Managing hostel and transport fee collections made easy3
  2. Select the Create New Fee Collection option.
  3. Enter the name of the hostel fee collection.
  4. In the Start date and End date fields, select the starting and end date within which the student must pay the hostel fee.
  5. In the Due date field, select the last date within which the student must pay the hostel fee. Students who do not pay the fee on or before the due date will be listed as a fee defaulter.
  6. In the Search Student field, enter the name or admission number of the student to search and assign.
  7. Click the Create button.

Schedule a transport fee collection for a student

Similar to hostel, you can assign an existing transport fee collection or schedule a new fee collection for a student.
Assign an existing transport fee collection to a student


  1. At the top of your dashboard, click the module access icon > Administration > Transport > Transport Fee > Fee Collections > User-wise Fee Collections to open the User wise Fee Collections page.
    Managing hostel and transport fee collections made easy
  2. Select the Choose from existing option.
  3. Select a batch and a fee collection.
  4. In the Search Student field, enter the name or admission number of the student to search and assign.
  5. Click the Create button.

Schedule a new transport fee collection for a student


  1. At the top of your dashboard, click the module access icon > Administration > Transport Transport Fee > Fee Collections > User-wise Fee Collections to open the User-wise Fee Collections page.
    Managing hostel and transport fee collections made easy1
  2. Select the Create New Fee Collection option.
  3. Enter the name of the transport fee collection.
  4. In the Start date and End date fields, select the start and end date within which the student must pay the transport fee.
  5. In the Due date field, select the final date within which the student must pay the transport fee. Students who do not pay the fee on or before the due date will be listed as a fee defaulter.
  6. In the Search Student/Employee field, enter the name or admission number of the student to search and assign.
  7. Click the Create button.

Something to note is that transport fees not only applies to students, but to employees as well. So you can now also schedule transport fee collections for individual employees.

Kicking off 2015 with Fedena 3.4.1

Design-Blog


2014 has been a great year for Fedena. We’ve grown massively as a company and as a product. So to continue the momentum, we are thrilled to kick off 2015 on a high note with our latest release – Fedena 3.4.1. With our latest release, we’re introducing, roll numbers for students, a single view for all your batch information, greater control over student fee collections and timetables, and more.

Student Roll Number

The feature many of you have been waiting for. Assign roll numbers to students that conform to your institution’s numbering scheme.

Student Roll Numbers

Consistent Date and Time Format

Pick the date format you want displayed consistently throughout Fedena. Time is now consistently displayed in 12 hour format.

Batch Summary

Keeping track of all your batch activities has never been this easy and convenient. Tutors can now view all information about the batches they handle from a single view.

Batch summary

Institution Type Setting

Specify if your institution is a K-12 or Higher Education type of institution and see subtle changes in your Fedena interface.

Student Fee Collections

Several enhancements have been made to scheduling and managing student fee collection to provide further flexibility and speed up your fee collection process. To highlight a few enhancements:

  • Ability to create discounts on fee categories as well as on fee particulars
  • Ability to create instant fee particulars or instant fee discounts when collecting fees

Timetable

A fresh interface that offers greater control to help you create those timetables you’ve always wanted to for your institution. Some of the enhancements include:

  • Ability to assign different class timing sets to each weekday
  • An enhanced user interface that makes it easy to assign employees to class timing records when creating timetables. Timetable
  • In a printed timetable, breaks are indicated as a broad grey line between periods.

We hope you enjoy this release, and as always, we love to hear from you. Write to us at info@fedena.com and give us feedback on what would make your Fedena experience even better.

Adding Custom Fields to Record Transport and Hostel Information

Custom--transport-&-hostel2
The latest version of Fedena has many new features as well as enhancements that extend its flexibility and benefits. One of the features added is the ability to add custom fields to record any information about your institution’s transport and hostels.


So the next time you use the Transport plugin to record vehicle and vehicle route information, or the Hostel plugin to record hostel and hostel room information, just remember, you can add custom fields to record any additional information deemed required or important to your institution.

Who can add custom fields?

Administrators and privileged employees (Transport Admin or Hostel Admin privilege must be provided) can add custom fields.

How to add custom fields?

Transport

  1. Go to the Transport module (Module access icon > Administration > Transport).
  2. Click Manage vehicle additional details to add custom fields to record additional information about your institution’s vehicles, or click Manage route additional details to add custom fields to record additional information about your vehicle routes.
    1 (2)
  3. Enter the name of the custom field.
  4. Select the status of the custom field from the following options:
    • Active – A custom field with this status will be available when recording vehicle or route information. For example, in the image below, the highlighted fields were custom added fields.
      2 (2)
    • Inactive – A custom field with this status will not be available when recording vehicle or route information.
  5. Select the Is mandatory checkbox to set this field as a mandatory field that must be filled.
  6. In the Input method field, select the field input method from the following options:
    • Text Box – Enter brief text information.
    • Text Area – Enter detailed text information.
    • Select Box – Select an option from a drop-down list.
    • Check Box – Select one or more items from a set of options.
  7. Click the Create button.
  8. Use the arrow icons ( 3 ) to determine the order the fields will appear in when recording vehicle or route information.


Hostel

  1. Go to the Hostel module (Module access icon > Administration > Hostel).
  2. Click Manage hostel additional details to add custom fields to record additional information about your institution’s hostels, or click Manage room additional details to add custom fields to record additional information about your hostel rooms.
  3. The rest of the procedure is the same as for Transport.

Custom additional fields can be made inactive at any time by editing and selecting the Inactive radio button. Once a custom field is made inactive, it will no longer be available when recording transport or hostel information.

4

Custom fields can also be deleted, but only if it has not already been used to record transport or hostel information.

Making Fedena Website Mobile-friendly: The Story Behind

Fedena-Mobile
With the role mobile phones play in our lives today, there isn’t a single doubt about the role handheld devices (especially mobile phones) play in taking forward businesses. Reach of business/product is greatly influenced by the number of mobile phone users covered. Not only that, Google has made it clear that websites that do well on mobile will get a solid boost in search ranking as well.

1

The above image shows the user experience our page (www.fedena.com) provided with respect to mobile users. It clearly depicts that the site is not mobile-friendly. Mobile friendly websites have gained so much importance and popularity that Forbes has included it in their marketing checklist. Delivering audience the content they want, within the context they are viewing it, is the one thing any business should take care of.

Let’s get Started

We wanted to build a mobile-friendly version of our site and there were two approaches to choose from:

  1. Modify the existing version
  2. Build new one from the scratch

The second approach make things simpler as all you need are a design, an approach and a mechanism of handling various devices, screens and resolutions. At Foradian, our Fedena website was already functional and much in use. So we had to think of the ways to reach out to the entire range of customer base and also we wanted to do it ASAP. The below image shows the distribution of our visitors on different devices:
2

Approaches

For search engines to understand that our website is set up for mobile too, we had to follow one among the three designs that Google has put forward for all the developers:

  1. Responsive Web Design
  2. Dynamic Serving
  3. Separate URLs

Having separate URLs seemed easier to implement as all we had to do was rewrite the contents and provide the views. Once the user tries to open a page through mobile, he/she will be redirected to the mobile version of the site i.e., m.fedena.com just like Yahoo! did earlier. This approach has other constraints like maintaining two versions of the site, being sure that all pages are provided with different views and that a page will have two URLs. Also Bing and Google advocate a one-URL approach for find-ability and SEO. So we thought of going with the other two designs and implementing them.

Our Approach

Dynamic Serving is a setup where the server responds with different HTML (and CSS) on the same URL depending on the User Agent requesting the page. User Agent is the string the browser sends to the server hosting the site which indicates the details of operating system being used, its version, the browser through which the site is being visited and its version so that the server can tailor the site according to the browser. Responsive web design (RWD) is a setup where the server always sends the same HTML code to all devices and CSS is used to alter the rendering of the page on the device. Simply put, Responsive design is a single version that auto-adjusts to display properly on all devices except the oldest cellphones or feature-phones.


However, the first two approaches have an advantage over the Separate URL approach – we need not have to have two separate URLs for the different versions. Also, we need not have to write separate views for each and every page; only the pages that are most important or viewed by many need to be handled.


How about implementing them both? Yes, we implemented both of these setups. Here’s how – depending on the User Agent, we planned to display a different layout. All handheld devices and desktop versions would have a different layout. But if that’s the case, how would we display content according to the screen sizes of handheld devices! That could be done through responsive design. So, it came down to two different layouts depending on User Agent and using media queries for each screen size or a screen size till a limit. Media Queries help in writing different styles for same classes and using them according to the media type and size.

Designing Priorities

At this stage, once the approach has been decided, we needed a design that is simple yet informative. Our aim in designing was to let the users have all the information they need and in the context they like but without sacrificing our content. For all mobile version of sites the top requirements are – a good design that would help users get the basic information he/she needs and the navigation links for every other page, keeping menus short and sweet, putting contact information up and front, providing links and adding videos and other features to keep the user engaged are sure ways to future-proof the site. Even the forms are simplified so that there will be no inconvenience to the user at any point. We have also decided to remind them as to which plan they are interested before filling the form which brings more clarity in them. Our design team did a splendid job and provided us the simplest UI with all the elements.

3

The above screenshot has been taken after Fedena website is made mobile-friendly.

Why a Framework

After getting the design, the first thing that we needed to decide upon was whether to use a framework and which one to use in that case. Challenge was to develop a modular structure that enables the content to best fit any screen size. To write the entire responsive CSS from scratch and making sure it works well in all browsers is a tedious task. That is where these frameworks enter and make life much easier.

Choosing a Framework

Among all the frameworks, Pure by Yahoo! caught our attention as it stands true to how it is described, as “an ultra light-weight and responsive set of CSS modules that can be employed in web projects at ease and they are responsive too !!.” Even though there were many other equally good frameworks along with Pure, its minimal and flat design which ensures that it would stand out of the way if needed was the foremost reason we chose Pure.
4 The above screenshot shows the size of the loaded page (541 KB) which is much smaller than the size of the desktop version. The page load size when viewed on a mobile internet device compared to being viewed on a desktop browser is comparatively smaller as the entire framework minified and Gzipped is only 19KB .

Development of the mobile version with design and frameworks and more

Featuring a video, content hiders, menu links as simple as they seem, implementing all these  might be a little difficult if we choose to ignore all the resources and plugins present. However, with the thousands of jQuery plugins and scripts present to assist in implementation, the developer just needs to choose the one that suits his/her requirement. In our case, we were happy with what jQueryUI accordion was providing and it took lesser time than writing it from scratch. We choose Owl Carousel, a touch enabled jQuery plugin that allowed us to create the beautiful responsive sliders. Apart from that the optimal use of jQuery/Javascript functionality made the implementation part much easy.

5

Now for a quick comparison, the below screenshot was taken before we started working on our website to make it mobile friendly.


6

Our Fedena website is now a mobile-friendly site. For a company that encourages its team to think like a customer, we are happy that our customers are now able to connect with us through their mobiles without any difficulty. More and more users are now accessing our site from their devices without any inconvenience. We are able to reach out to a wider user base, thanks to our mobile-friendly website.


7

As you can see in the above screenshot, we were successful in making fedena.com, a mobile-friendly site.
This article is written by:


IMG_2811 (1)  Poornima G


A developer by profession and an explorer by nature, she tends to learn new things from every avenue she traverses and finds happiness in implementing them in her endeavors.
Beyond the work-space, she intends to lose herself in sleeping, travelling and reading.

How to Revert an Archived Student

Revert-Archived
In our previous article, we showed you how to archive a student record. We also told you that when a student record is archived, the record moves from the active record list to the former record list. The record is not deleted from Fedena, so you can always find it later using the Advanced Search function. But there are times when you may need to revert an archived student record and make it active because:

  • you graduated a student in Fedena who was not eligible for graduation.
  • you accidentally archived the wrong student.
  • you are admitting a former student to your institution.

Whatever the reasons maybe, you can revert a student record as long as you’ve archived it and not deleted it.

Who can revert an archived student?

Administrators and privileged employees (Manage users, Admission, or Students control privilege must be provided) can revert an archived student.

Procedure

  1. Use Action Search at the top of your dashboard to search for an archived student. Search using the student’s first name, last name, or student admission number. When searching for a student, make sure to click Search students.
    1
  2. Click on the student name. The student’s profile is displayed.Revert an archived or graduated student
  3. In the top right, click the Revert archived student button.
  4. Click OK to confirm.

Does all records and settings get restored?

When an archived student is reverted, all records and settings including the student’s login credentials and batch information are restored except the following:

  • Any placement details that the student was part of
  • Online exam marks entered for the student
  • Hostel room allotment details
  • Transport route allotment details

The Way We Test has Changed

TestTeam (1)
Hello folks,
Greetings!

First of all, let me introduce myself. I’m Gautam, the new Test Lead at Foradian. The intention of this article is to let you all know about the way testing has changed at Foradian over the past few months and the benefits we have derived out of it. This article would be of interest to all those who have got bored of the Conventional Approach to Testing i.e. maintain elaborate test cases, execute them and mark them as “Pass/Fail”, and repeat the test execution over multiple cycles in a monotonous manner! Have you come across testers who would say “Testing is so boring”? If yes, they are right, because the approach they used to test might be boring! Making the testing activity as boring or interesting is completely in tester’s control. Do read on to find out how our Testing Team has benefited by using the Exploratory Testing Approach rather than the Conventional Approach. By the way, it feels glad to inform you that our Test Team has grown in size from 2 to 5!

Here’s the feedback from a couple of our testers!

Sreeshanth, our Senior Tester says:

I was unaware of the Exploratory Testing approach when I began my career. I got a taste of it in July 2014. I learnt that Exploratory Testing  refers to simultaneous test design, test execution and reporting. In this, the tester has complete freedom to test the application of interest. In my opinion, the earlier test approach we followed was more time consuming than the current one. Previously, after completion of the development process, we directly started testing by creating a document, which was also shared with the developers. First we tested in the dev’s local server, and once all issues were fixed, we used to begin testing in the test server.

With the use of Exploratory Testing approach, a lot has changed. When we get a new feature to test, we won’t know much about the behavior. So initially, we go through the SDS and SRS to get a fair idea about the feature. Later we brainstorm using mind maps. I felt mind mapping is the perfect tool to brainstorm test ideas and execute them, gradually evolving our test ideas while testing. This way, testing becomes interesting and empowers the creative side of testing, which feels rewarding too. After this, we create lean test design (Test ideas and scenarios without elaborate steps to be performed) in excel format and share it with the developers. The important thing is, we start the testing process even before the development begins, which is also helpful for developers to understand the feature from an end user’s perspective. After a feature is developed, we execute tests in the test environment and report the results. With this approach, we could test faster and with more creativity.

Ali, another Senior Tester says:

I would consider the change in the test approach a welcome change, when compared to the methods used by my previous employers. From what I understand, the earlier approaches were tedious and time consuming. They sucked the fun out of testing. I believe it is important for the tester to enjoy his testing activities. Conventional test approach limited the exposure to practical scenarios that would be encountered by the user. Since the tests were scripted and static, it also lead to limited expectations.

With the use of ET, we do not document the expected results, because there could be many and it’s up to the tester to identify them while testing. ET provides personal freedom since testing is not defined in advance. I found it to be intellectually stimulating. The use of mind maps enables me to make note of the important areas to be covered during testing. I remember having used it during my early days in Foradian for testing a feature along with Gautam. Exploring one module or scenario opened doors to many other possible scenarios. ET gives better coverage too. It is important to find the critical defects in a timely manner and ET helped in identifying the critical defects very quickly. Usually with ET, there is the risk of not being able to recreate the scenario that led to the issue in the exact manner, but this is taken care by the lean test documentation approach we follow. Mind maps and test reports are maintained for documentation.

Our New Test Approach

Involving the Testing Team in the UX Design phase itself, so that UI/UX bugs could be identified well in advance, rather than during testing. We do the Test Design as soon as the UI prototypes are available, and add more tests during the Exploratory Testing phase.

  • Implementation of the Test Strategy mind map for every feature to be tested, lists the probable areas impacted by the feature. This list actually expands our test ideas to achieve better test coverage. This would also help our developers to know and handle impacted areas across modules.
  • Following the Lean Test Documentation (Flexible excel template for listing only the test ideas and test scenarios, excluding elaborate test steps, and marking the test execution results against them) approach helps us devote less time for Test Design and more time for Exploratory Testing.

Here’s a sample Test Strategy mind map for your reference!

Revert Archived Student. - Test Strategy
To conclude with, we are committed to test your favorite Fedena much better, resulting in minimal bugs which hardly bug you, thereby giving you an enhanced user experience! Team Foradian is thankful to you for your unprecedented support and cooperation.

The article is written by:

GautamGautam M S
“Gautam doesn’t breathe air, he breathes testing instead. He is a disciple of the Context Driven Testing community and testing is his way of living. You can’t convince him without logic! He believes testing is a scientific way of analyzing things at hand!”

ERP in Education: The pros and cons of ERP implementation in education

ERP-Jan29_15 (1)

We live in a world where computers are omnipresent; technology has entirely changed the way we live, towards the better. And education is one such name where technology and the use of computers have changed the way it is delivered, completely different from what it used to be in the last decade. Other than various new learning techniques like online courses, smart classrooms; technology has equally simplified the management of educational institutions.ERP implementation have been revolutionizing institutional management for sometime now, helping institutions to improve their operations, thus making them manageable and more transparent.

ERP in education is not a new concept; ERPs were in full-fledged use in major corporations in some of the biggest industries, to ease the management process. With the development of technology and widespread demand for computing concepts has led to the increasing popularity for ERP solutions in other industries like educational institutes.

ERPs over traditional system of management

So, what gives educational ERP the edge over traditional method of management? Definitely, its the time and efficiency factor that places the software ahead of the traditional methods. Managing funds in an institution and tracking them into a report almost sounds like rocket science if done manually. A lot of productive time goes into meeting this kind of specific requirements. Moreover, management of a lot of basic operations like inventory, HR, finance and other services at times appear a complex task. Educational ERP implementation can ensure an institution function at its maximum potential.

The benefits of an education ERP system


An education ERP definitely has a lot to offer, like-

  • Cost effective: Perhaps the most prominent advantage of using ERP in education is the costing factor. Saving on the amount of man hours let you save so much on finance. Basic campus management requires a lot of manpower to manage things like fee collection, the grueling admission process, etc. When this management is done online, a lot is saved on the finance sector which can be used in other useful purposes.
  • Better organization of data: Organize your data the way you want. Education ERP gives you a lot of ways to organize data of your institution that would help in proper management of it. Data is managed well and available with a single click of a mouse.
  • Data is secured: Data or information stored in web servers are far more secured that those stored physically in shelves. Storing information and data stored by ERP software in servers have backup systems and thus, your information is preserved! Is it possible with physical storing of data and files?
  • More automated administration: The entire administration which was otherwise managed using huge manpower, involving all possible flaws that are not tracked easily and managed. With education ERP, the point of flaws in managing important administration processes like fee collection, library books, admission list, etc is nearly minimal, unless there are some human errors in filling up information or technical glitches.
  • A quicker management process: Education ERP software quickens the entire process of institutional management to great extent, lets say in a matter of seconds. All you need to wait for is the implementation of the ERP software and you are set for a faster management of your institution like never before. Be it the admission process of an entire new batch of students or generating customized reports on a particular batch is a task done in minutes.
  • More focus on education: When most of the time is saved from taking one-to-one attendance in class or filling up the mark sheet after every exam, a lot of time is saved to be invested in what is more important- teaching!

The limitations of an education ERP

Of course, there is other side of the coin too! Even if the management of your institution is available within the single click of a mouse, there are some limitations that prevents institutions to choose education ERP solutions for better management. Some of them being,

  • One failure of ERP in education can be measured in terms of achievement of Return on Investment (ROI). When the ERP implementation doesn’t yield enough ROI, it can be a failure.
  • The cost of ERP, its planning and implementation, customization, configuration, etc might be too much for lesser profit-driven schools.
  • Most ERPs are difficult to learn and use. With complicated user interface that requires thorough user training, it requires complete participation of users.

Time has come for all educational institutions to go the smarter way. Re-organize the management systems of your institutions to match the evolving technology in every aspect of life.