Tracking Student Attendance just got Easier

Fedena-Blog---DailyAttendance_b
Tracking student attendance for your institution is very important. It helps you evaluate its quality, make timely administrative and financial decisions, and plan events such as fire drills and other institutional activities. Being aware of student attendance is not only important for your institution but also for your students. Regular attendance is important to a student’s academic success. Knowing your student attendance will help identify absence trends and give the institution the necessary data to establish an action plan to change the attendance culture of an individual student or a group of students. To help you with all this, we’ve introduced the Day-wise Attendance Report as part of Fedena 3.4. On any given day, you can now easily track the overall student attendance of your institution, as well as for each batch.

Who can access the report?

Only Fedena administrators and privileged employees (either the Student Attendance Register privilege or the Student Attendance View privilege must be provided) can view the Day-wise Attendance Report.

How to access the report?

After you log in to Fedena, go to the Attendance module.
1

Remember, this report is available only if you mark student attendance Daily.

What does the report show you?

The Day-wise Attendance Report displays the number of students present in your institution, as well as the number of students absent in each batch on a particular day.
Generate the student day-wise attendance report

To view the student attendance count for a previous date, all you need to do is change the date. The Overall Strength in the top right is the total number of students present in your institution for the selected date.

Use the Select a course field to view the number of students absent in each batch of a particular course. You can then click on a batch to view the names of absent students.

Generate the student day-wise attendance report1

To generate a CSV report of the number of students absent in each batch, click the CSV report button.

Need a Career Lifeline? Explore the world of MOOCs

MOOCs-1

These days everyone has something to say about online courses and websites. There is so much of buzz about how these courses are becoming the top choice of professionals around the world who are dealing with time crunch. Thus, there is no doubt regarding the fact that online courses are quite useful for the masses. How they can help your career?

According to an estimate, more than 4 million people from around the world have made 22 million registrations for free classes at Coursera.org, which happens to be the largest provider of Massively Open Online Courses. This goes on to show how popular e-learning has become in the current times. Besides, world’s top universities including Stanford, MIT are competing with each other to offer free Massive Open Online Courses to anybody who has internet access.

Here are some reasons why online courses are such a rage for working professionals:

Diversity of Topics:

There are courses for every possible topic that you can imagine. Whether it is a hobby like photography, or a singing, or something as serious and sophisticated as nanotechnology, you can find courses for all of these on various online platforms. And what more, many of these courses are accredited from top universities.

Flexibility of timings:

A professional is always running on tight deadlines. Ask any white collar professional and he would always want some extra time for completing a project. It will be too much to expect professionals in such cases to take time out for regular classes. This is where these online courses win their case. Almost every course and the site offering them provide this option of “time-travelling” i.e you can travel in time according to your wishes to learn your favorite topic. There is no strict time window to cover a particular topic.

Highly focused:  

The biggest benefit of pursuing an online course for a professional is its conciseness. You can cut the crap and directly concentrate on the relevant parts. For example, if you are working in the analytics industry and all that you are concerned about is learning to use Google analytics, you can focus on courses that teach Google analytics instead of learning the entire history of digital marketing and web analytics. This will not only save a lot of time but also help you to remain focused.

So how exactly can you make the most of these online courses?

Set some definite goals

With the mind boggling number of courses at your disposal, the world of MOOC can leave a person totally dazed and confused. The best way to avoid getting lost is to define your end goal, which you want to achieve and determine which classes or courses will help you achieve them. Those of you think that MOOC are less tough and easy should double check their facts. You will be surprised to know that online courses are just as rigorous as their university counterparts. In fact, a University of Pennsylvania study reveals that only 4% of students who register for a MOOC actually goes on to complete it.

Search for the perfect course

There is endless number of resources where you can find a course for your requirement. However, always trust only the most reliable and which has a credible community following. The current dominating platforms include Coursera, Udacity and edX. These have the largest catalogue of courses which meet the most varied demands of professionals. Each platform has its own strengths and it is good to know which platform excels at what. Udacity is known for its best-in-class computer science and math courses. edX has a slight inclination towards science, technology and math. There are MOOC search engines such as MOOCSE and Class Central for your help as well.

Review what you have learnt and add to your resume

Once you complete your classes, it’s time to review whatever you have learnt.   Figure out the ways in which you can add them to your CV to make the best impact. You can add these skills under a separate tab such as Professional Development or Extra Competencies. You can also add these newly learned skills to your LinkedIn profile. LinkedIn also offers you the opportunity to automatically display badges from completed MOOCs on your profile.

Although the world of MOOCs is still evolving and many employers still don’t give them the attention they deserve, one should not doubt their efficacy. Pursuing an online course or e-learning is certainly one of the best and economic ways of keeping your skills updated and learning new skills.

This article is written by:

Saurabh Tyagi. Saurabh is a blogger with interests in various new media technologies. He made a radical shift from his core engineering degree to this world of internet. He provides advice on how to formulate a resume by providing resume samples as well.

Take Control Over Your Sales

Take-control-over-sales (1)
For institutions who constantly purchase and sell items, managing inventory can be just as crucial as managing finance. And if you thought tracking all your institution purchases were hard, tracking outgoing items and their invoicing can be even harder.

Introducing ‘Sales in Inventory’, a feature part of the Inventory plugin that enables institutions to easily record and track items they sell. From student uniforms to textbooks to sports equipment, now sell any item and let Fedena do the rest of the work. And what good would it be to make all those sales and not know the status and value of the items sold. Fedena generates comprehensive sales reports that help you keep track of your store sales, the availability of items, and the amount collected for each item.

Workflow to set up and to track items sold
Flowchart

Who can manage items for sale

Fedena administrators have complete privileges over the ‘Sales in Inventory’ feature. Administrators can set up items for sale, create sales invoices, as well as generate sales reports. Fedena offers the following inventory privileges that can be assigned to employees.

Privilege Control
Employee Manager Inventory Setup items for sale and generate sales reports.
Manage Inventory Control the complete Inventory module, which includes all activities connected with ‘Sales in Inventory’.
Inventory Basics Set up items for sale.
Inventory Sales Create sales invoices and generate sales reports.

Step 1 – Create an item category

The first step would be to create the item categories under with each item can be recorded and sold.

  1. At the top of your dashboard, click the module access icon > Administration > Inventory > Item Category to open the Item Category page.
    1
  2. Enter the name and category code, and then click the Save button.

Step 2 – Record a sellable store item

  1. At the top of your dashboard, click the module access icon > Administration > Inventory > Store Items to open the Store Items page.
  2. In the top right, click the New button.
    2
  3. Enter the item details.
  4. Select the Sellable checkbox.
  5. Select an item category.
  6. Click the Save button.

Step 3 – Advertise and sell the item

Now that you’ve recorded the items to be sold, how do you let everyone know that a sale is on? The answer is right in front of you – Fedena. You can use Fedena to seamlessly communicate to your students, parents, and employees. Some of the best ways would be to:

  • Use the News module to announce to the whole institution that a sale is on.
  • Use the SMS or Email module to send a message.
  • SMS and Email settings not configured? Not to worry. Use Fedena’s internal messaging system to send out a quick note.
  • Already have discussion groups setup in Fedena? Use the Discussion module to share the message.

Step 4 – Create a sales invoice for the items sold

Complete your sale by creating a sales invoice and issuing a copy to your customer.

  1. At the top of your dashboard, click the module access icon > Administration > Inventory > Billing to open the Invoice page.
  2. In the top right, click the New button.
    3
  3. In the Store field, select the store to which the item belongs.
  4. In the Issued to field, enter the Fedena user ID to search and select the user. The Name field and Address field automatically populates the user information.
    Note: If the customer is not a Fedena user, you can manually enter the customer’s name and address.
  5. Enter the billing details. You can search for the item using the item code or item name. If required, you can create an invoice for more than one item clicking Add New Item.
  6. In the Tax (%) field, enter the item(s) tax.
    4
  7. Enter any additional charges or discounts applicable. The Total is the amount to be paid by the customer.
  8. Select the Is Paid checkbox if the item is paid for.
    Note: You can create an invoice even if the item(s) is not paid for. When you later receive the payment, you can edit the invoice, select the Is Paid checkbox, and then save the invoice.
  9. Click the Save button to create the invoice.
    5
  10. Click Print to print the invoice.

You can always print the invoice at a later time as well. Go the Invoice page (module access icon > Administration > Inventory > Billing), and then search and select the invoice to print.

Step 5 – Generate sales reports

Use the following reports to know how your sales team has performed:

  • Item-wise Report
  • Day-wise report
  • Invoice Report

Item-wise Report

Use the Item-wise Report to view the availability of items and the amount collected for each item.

At the top of your dashboard, click the module access icon > Administration > Inventory > Reports > Sales Reports > Item-wise Report.

6

Day-wise Report

Use the Day-wise Report to view the amount collected and the total number of sales made by each store on the specified date(s).

At the top of your dashboard, click the module access icon > Administration > Inventory > Reports > Sales Report > Day-wise Reports.

7

Invoice Report

Use the Invoice Report to view the list of invoices together with their details for the specified date(s).

At the top of your dashboard, click the module access icon > Administration > Inventory > Reports > Sales Report > Invoice Reports.
8

You can also click on an invoice number to view the complete invoice details.

So there it is, use Fedena to record and track the items your institution sells and ensure proper financial management and accurate reporting.

Archiving or Deleting a User Record

Archive
The difference between archiving and deleting an employee or student record is – when you archive an employee or student record, the record moves from the active record list to the former record list. It does not delete the record from Fedena, so you can always find them later using the Advanced Search function. When you delete an employee or student record, all data associated with the record is removed. You cannot restore deleted records.

Who can archive and delete?

Only Fedena administrators and privileged employees can archive and delete employee and student records. For a privileged employee to be able to archive or delete employee records, either Manage Users or HR Basics privilege must be provided. Similarly, to be able to archive or delete student records, either Manage Users, or Admission, or Students Control privilege must be provided.

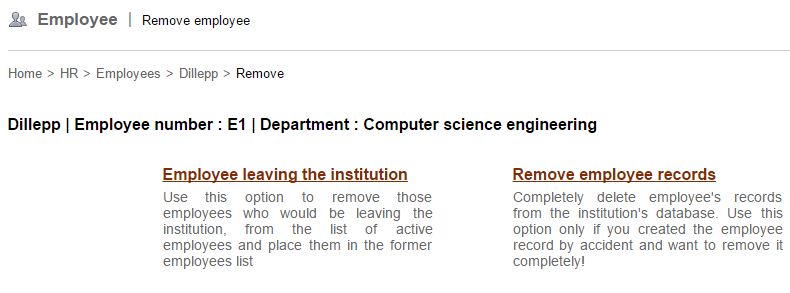
Archive or delete an employee record

When archiving or deleting an employee record, the following two options are available:

  • Employee leaving the institution – Use this option to archive and move the employee from the active employee list to the archived/former employee list.
  • Remove employee records – Use this option to delete all information associated with the employee. Once deleted, the employee record cannot be restored.

Note: You cannot delete an employee record that has dependencies—such as, subject association, part of a discussion group, and so on—in other Fedena modules. Unless the dependencies are removed, you cannot delete the employee record.

  1. Go to the employee’s profile. You can find the employee using the search bar at the top of your dashboard, or through the Manage Users page (Module access icon > Administration > User).
  2. When you find the employee, click on the employee’s name to view the employee’s complete profile.
  3. In the top right, click the Delete
1

The Remove employee page is displayed.
2

  1. If you want to archive the employee record, select the Employee leaving the institution You must specify the reason for the employee leaving, and then click the Delete button.
    3

If you want to permanently delete the employee record, select the Remove employee records option. A confirmation message is displayed. Click OK to confirm removal.

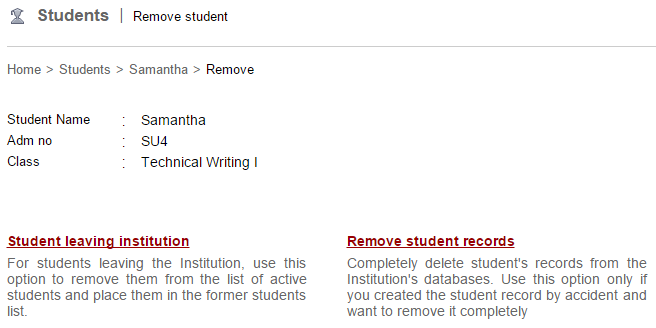
Archive or delete a student record

When archiving or deleting a student record, the following two options are available:

  • Student leaving institution – Use this option to archive and move the student from the active student list to the archived/former student list.
  • Remove student records – Use this option to delete all information associated with the student. Once deleted, the student record cannot be restored.

Note: Unlike employees, student records can be deleted even if the student has dependencies in other Fedena modules.

  1. Go to the student’s profile. You can find the student using the search bar at the top of your dashboard, or through the Manage Users page (Module access icon > Administration > User).
  2. When you find the student, click on the student’s name to view the student’s complete profile.
  3. In the top right, click the Delete
    4

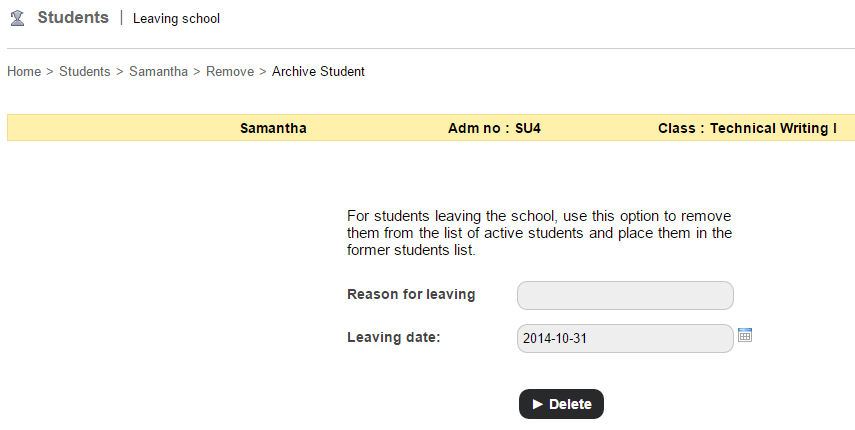
The Remove student page is displayed.
5

  1. If you want to archive the student record, select the Student leaving institution You must specify the reason for the student leaving and the leaving date, and then click the Delete button. 6

If you want to delete the student record, select the Remove student records option. A confirmation message is displayed. Click OK to confirm removal.

If the student has dependencies in other Fedena modules, a warning message similar to the image below is displayed.
7

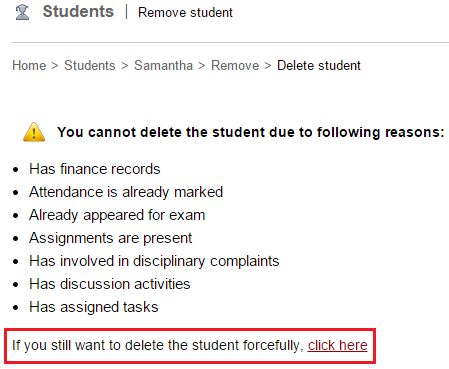
If you still want to delete the student record, click the link.

Now that the student record is archived or deleted, you may be wondering what happens to the associated parent record. So here’s what happens:

  • If a student record is archived, the parent record is no more active. However, if the archived student is a sibling, the parent record will remain active.
  • If a student record is deleted, the parent record is also deleted. However, if the deleted student is a sibling, the parent record will not be deleted.

There are many reasons why an institution would want to archive an employee or student record in Fedena. It could be because the employee no longer works at the institution, or the student has moved to another school, but you want to keep their information in Fedena so you can access it at any time. Similarly, there are many reasons why an institution would want to delete an employee or student record permanently. It could be because a duplicate employee or student record was created, or a factitious record was created when learning Fedena, or a record was created accidentally or with incorrect information.

Whatever the reasons may be, Fedena offers the flexibility either to archive the records or to delete the records permanently.

Celebrate this Christmas with the all new Fedena 3.4

Fedena 3.4 for Blog

It’s almost Christmas, and we are pleased to present Fedena 3.4, which delivers improved performance and provides further flexibility. We have been listening to your feedback, and this release offers many exciting new features and enhancements, and also includes a significant number of key fixes to Fedena.

To highlight some of the new and enhanced features:

  • Revert an archived or graduated student with all associated settings in just a single click.
  • Customize the type of hostel or transport information to be recorded based on your institution’s requirements.
  • Optimized, interactive dashlets that take you right to the information you are looking for.
    New Dashboard (1)
  • A report to easily track the overall student attendance in your institution, as well as for each batch.
    2
  • Assign various finance privileges to help define employee roles and responsibilities while ensuring security.
    3
  • Create fee payment transactions for any custom date.
    4
  • Calculate students’ CGPA either By GPA Average or By Credit Hours.
    5
  • Various enhancements to the Timetable module making it easier to create and manage clear and error free timetables.
  • Fedena supports over 20 languages, and now you can add Dutch to the list.

The Foradian elves have been working hard over the past couple of months to advance Fedena and to create an amazing experience for our users. We are excited and are looking forward to you getting your eyes on this major release. We will continue to work hard on addressing more of your feedback as well as introducing new features to make your Fedena experience even better.

We’re eager to hear from you! Write to us at info@fedena.com and let us know your thoughts, questions, and feedback.

We hope you all enjoy a wonderful holiday season, and we’ll see you in 2015 with more great releases.

Tracking Student Fee Payments just got a lot Easier

Finance-Fedena
Monitoring and tracking student fee payments in an institution can be a daunting task for staff in your finance department. To help institutions always be aware of the status of student fee payments and the fee discounts, we have introduced the following three new finance reports as part of Fedena 3.3:

  • Batch wise Report
  • Fee Collection wise Report
  • Students wise Report

Only Fedena administrators and privileged employees (either the View Additional Reports privilege or the Finance Reports privilege must be provided) can view all three reports.

How to access the reports?

If you’ve been provided the View Additional Reports privilege, you can access the reports through the Reports module.

If you’ve been provided the Finance Reports privilege, you can access the reports through the Finance module – Click the module access icon > Administration > Finance > Fees > Students Fees Head-wise Report

1 2

Batch wise Report

The Batch wise Report displays the amount of fees paid and due for each fee particular, by all students of the selected batch.

To view the report for a particular batch, select a course, and then select the batch and click Search.

3

You can also export the report details as a CSV file.

Fee Collection wise Report

The Fee Collection wise Report displays the amount of fees paid and due for the selected fee collection, by all students of a batch.

To view the report for a particular fee collection, select a batch, and then select the fee collection.

4

You can also export the report details as a CSV file.

Students wise Report

The Students wise Report displays the amount of fees paid and due for each fee particular, by a particular student.

To view the report for a particular student, enter the name or admission number to search.

5

Now that you know how to use the student fee reports, use them to your advantage and track all student fee transactions with the institution and never let a penny slip through your fingers.

Generate ICSE reports with ICSE grading feature by Fedena 3.3

ICSE (1)

In our last post on ICSE grading system feature by Fedena 3.3, we have discussed about the configuration that you need to do before you start using the feature. Once you’re done with the configuration, the next step requires you to enter the marks of students. The feature also allows you to generate reports based on the marks of students. Read the article and find out more on generating ICSE reports.

How to generate ICSE Reports

When you login to your Fedena account, you are required to go to ‘ICSE Reports’ in ‘Examination’.

1
As you can see in the screenshot above, the Reports Center has four options:

Generate Reports: You can generate a report on the student scores entered. Next, you need to select the particular course for which you want to generate the report.

23
View Student Report: To view the report of particular students, you can use this option. It gives you the score card of students.

4
As you can see, this is a report card of a particular student. Likewise, you select other students from ‘Students in this batch’ as marked in the screenshot. A ‘Term’ is used in most ICSE institutions under which the examinations are conducted. Most schools have two terms- Term 1 and Term 2 exams.

Subject-wise Report: Similarly, you can also generate report of students based on subject.

5
Consolidated Report: Get a consolidated report of all the subjects together for students.

6
The consolidated report of students in the particular course and batch.

Note: Generating report is highly flexible and it offers you the option to generate reports on multiple combinations in subject-wise and consolidated report. This means, you are allowed to generate reports based on terms, on internal marks alone or external marks or a combination of both, etc.

Introducing the all new ICSE grading system with Fedena 3.3

ICSE

The earlier version of Fedena offered different types of exam grading like the GPA, CWA and CCE. But the new version of the software, Fedena 3.3 has introduced a new core feature called the ICSE grading system which will allow institutions following the ICSE grading pattern with exams and courses. Before using this core feature, you need to know the feature well. Today, we will cover the configuration part that you need to do to use the ICSE grading system feature for your institution.

ICSE Grading- The configuration process

Before you start using the ICSE grading system for examinations in your institution, you need to do some configuration. For this, you need to first go to ‘General Settings’ where you will select ICSE as the grading system.

1

As you can see in the above screenshot, ‘ICSE’ has been selected as one of the grading systems. Before proceeding to the next step you need to upgrade all the relevant existing courses to ICSE grading system.

2
3
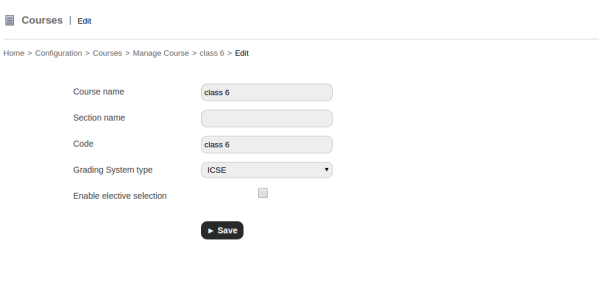
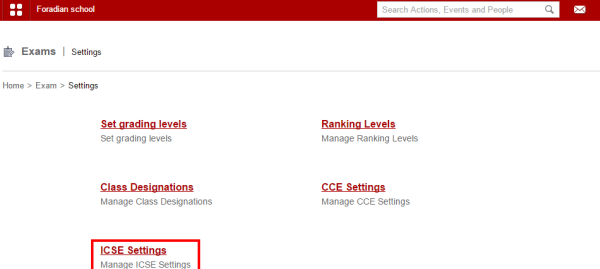
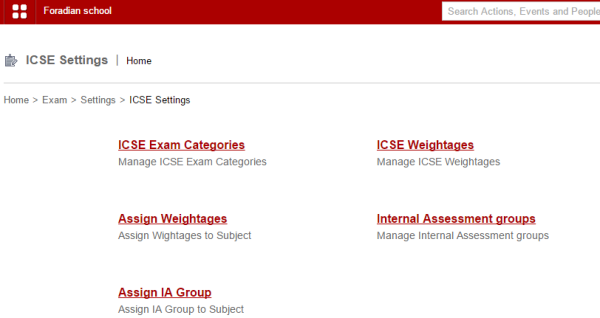
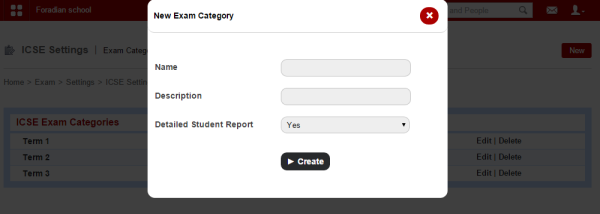
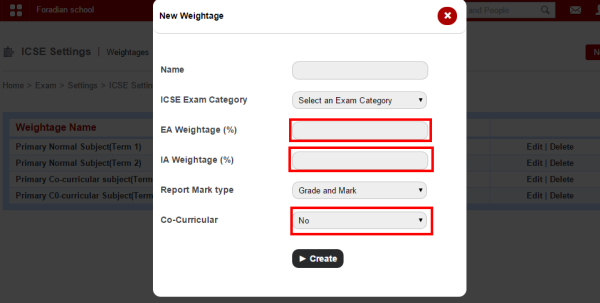
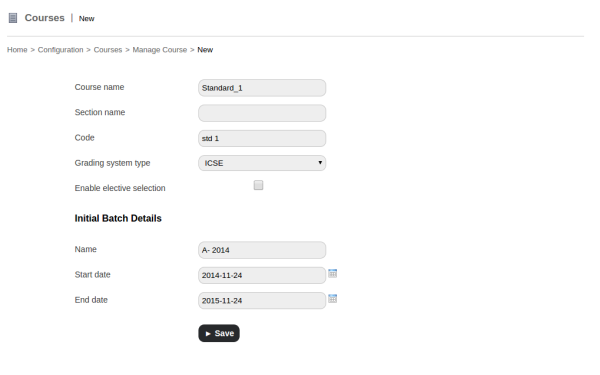
For all the other new courses, use ICSE as the opted grading system as shown in the screenshot.

Then comes the part of adding relevant ICSE settings from the Settings part of examination.

4

‘ICSE Settings’ will take you to its page where you need to do the configurations.

5

ICSE Exam Categories: This section will let you create new ICSE exam categories. Clicking on the ‘New’ option will let you create new exam categories.

6

Fill in the necessary information to create the new exam category.

ICSE Weightages: The next step is to create the ‘ICSE Weightages’.

7

Provide with the EA or External Assessment weightage and IA or Internal Assessment Weightage along with option of co-curricular activities (if co-curricular activities are part of any of the weightage.)

Assign Weightages: The weightages created above has to be assigned to respective batch and for this, you need to select the respective batch and also the subject.

8

Internal Assessment Groups: Create a new internal assessment group for internal assessment exam.

9

Create the group by filling up the necessary information. Make sure you provide the indicator and the formula. Description of all formula is given in the right-hand side of the page, as shown above in the screenshot.

Assign IA Group: Once you are done creating IA group, the next step is to assign the IA group.

10

Assign IA group and you are done with ICSE exam configuration.

In the next article, we will be talking about the ICSE Reports in detail.

The All New Remarks Module with Fedena 3.3 to Provide Remarks to Students

Remarks_Module

Introducing a new module with Fedena 3.3, Remarks let you provide remarks for each of the student on the basis of performance in different subjects or some common remarks on individual student on any particular exam conducted. The module also allows administrators to provide custom remarks on the students. To know more on the Remarks module, go through the article below.

The Remarks module

The Remarks module can be used in three major forms- as common remarks, subject-wise remarks and custom remarks.

How the three major forms of the module works

A subject teacher or a tutor of the particular batch has the privilege to provide remarks.Subject teachers can add/modify remarks for those subjects which they teach whereas the tutor can add/modify for all subjects in that batch. For this, you need to go to ‘Exam Management’ in ‘Examination’. Select the particular course and the respective exam as well as the subject to provide remarks for each of the student on the particular subject.

4

As you can see, individual marks are given to each of the student in the respective subject.
2.png

Remarks can also be added for a particular subject from Exam Wise Reports and Student Transcript Page.
To check the report on remarks based on exams, you have to go ‘Exam Wise Reports’ in ‘Exam’ and select the batch and exam group.
3
The screenshot above shows the subject wise marks of the particular student. For ‘Common remarks’ on the particular students, you have to click on ‘+Add remarks’ as marked in the screenshot, and add your respective remark for the student. ‘Common remarks’ are helpful when you want to provide with extra remarks for any students on the particular exam the student attended.

When you are looking forward to provide with custom remarks, you need to go to ‘Remarks’ in ‘Academics’. There is an option to ‘Add custom remark’ which when selected will ask you to select the particular course and batch.

4
For custom remarks, you have to provide the name under whom the remarks are to be published, in the ‘Remark by’ box. Provide with a ‘Subject’ as well before filling up remarks for each of the student. ‘Custom remarks’ are those remarks which are general comments on any student on the overall performance.

PDF report on the remarks can also be extracted.

World Usability Day – Fedena has all Reasons to Celebrate!

Usability-day


How do you define usability? ISO 9241 standard  defines usability as “The extent to which a product can be used by specified users to achieve specified goals with effectiveness, efficiency, and satisfaction is a specified context of use.” What conclusion we can come to is that, usability is all about the ease of use and this ease of use must be defined on the outlines of effectiveness, the ease of learning, the engagement and efficiency it involves. Well, with these characteristics, Fedena is highly usable and its usability is attributed to its features which are especially designed considering users and their context of use in mind. The words of Mr.Anh Pahn from Wellspring International School, a Fedena client,further establishes how Fedena fulfills the characteristics of usability.


“A great user experience. I liked the search engine inside Fedena! Anyone can use Fedena in seconds. Mr.Anh Pahn, Wellspring International School,

When we talk about the usage of a software, an ERP software and its usage is way different from that of most other web software. This is because, the lifeline of usage for most of these web software is limited to once or twice by the given user; whilst, an ERP software is there for a longer time, sometimes, couple of hours a day. Thus, usability takes an important stand when it comes to time span of usage of a software. How will you be comfortable using a software if its not easy to use, simple to learn and highly engaging? Team Fedena works hard to build a better user experience with simplified features in a way that fits the real world context, facilitating users to perform their tasks all the more efficiently with Fedena.


“Fantastic UI, The entire user experience is so fabulous that it makes a lot of sense for students because they are used to that kind of a clutter free design” Mr.Lux Rao, Chief Technical Officer, HP India.


Yes, it is Fedena’s clutter free design and easy to use dashboard that helps Fedena to reach educational institutions of all genre. Fedena’s single dashboard contains all the features, thus users don’t have to migrate to other pages to look for different features. Fedena requires anyone with basic computer knowledge to operate easily, thus allowing customers from diverse age group- a student in the junior class can use it with the same ease as that of somebody from the management body of an institution. This is one point that has taken Fedena to almost all parts of the world, with 40 000+ schools and colleges trust the software to manage their data and 20 million+ students and teachers stay powered by Fedena. The improved UX of Fedena helped us with better user engagement and a sales growth of around 40%. The reason being the growing importance of usability, apart from features as well.


Today, on November 13, 2014, on World Usability Day, we are  confident to claim that Fedena is more usable than it was on November 13, 2013 and it continues in its journey towards evolvement. We, at Foradian Technologies, continue to do our best in making Fedena more usable and our efforts have been acknowledged and received well by a most of our users.


“Fedena with its beautiful and innovative UI/UX design is loved by the teachers and other users of our institutions. It has increased the productivity and efficiency many fold”, Mr.Deepak Reddy, Aditya Group of Institutions, India.


If you are a Fedena user, please feel free to provide your valuable comments or suggestions on the UI/UX of Fedena. We will be happy to know your experience!

The new Color Theme plugin by Fedena 3.3

Fedena-color-theme

The new Fedena 3.3 comes along with a lot new features to provide the best of user experience. Today, in this article, we will feature a brand new plugin that has been introduced with the new version of Fedena, called the Color themes. Earlier version of the software allowed only six color themes, which has been extended to more options. This allows our users to choose a color theme of their choice from the color picker. Read the article for more details on the plugin.

Choosing Color Themes and font

When you login to your Fedena account, go to ‘General Settings’ in ‘Settings’.

1
Here, as you can see in the screenshot above, you have the option to choose color from the available colors for theme. For more colors, select ‘More colors’.

2
Choose any color of your choice.

For font, you need to go to ‘Select font’ option in the ‘General Settings’ page only.

3Selecting font is a completely new feature in the color theme plugin. Choose from the 7 font styles available from the list.